Hosting a web app has never been so easy!
Designed by:
Stazia "WigginWannabe" Tronboll
and
Colin "MrSwirlyEyes" Keef
This tutorial is a walk-through to set up a MEN Stack Webserver on your computer - or even a Raspberry Pi! It is extremely easy for any Linux based environment (e.g. Linux computer, Mac computer, Raspberry Pi, etc.). Of course, you can set up a Webserver on Windows too!
When we talk about the 'Stack' for a web development project, we are referring to the tools that the application is built on. You'll hear popular terms like, MEAN, MERN, or LAMP, which are all just acronyms for the tools that that particular stack uses. They all include these tools, though in different orders:
These stacks are a small sampling of the multitude available, but all serve the same purpose of describing what tools a given project will use. In the case of this tutorial and the Projects that branch off of it, we use a MEN stack - MongoDB, Express, and Node, but with vanilla javascript on the frontend instead of a framework.
Please be advised that this tutorial is mostly concerned with the installation and configuration of a MEN stack, and not a detailed development of a complete web app! We do, however, have Projects for that!
We will start by installing MongoDB, the database service we have chosen. There are several options for databases, both relational and non-relational, and our choice of Mongo is largely arbitrary. A notable benefit is the well-supported Node library mongoose, which is an easy way of interacting with Mongo through Node. Before we move on to setting up Mongo locally (that is, making a database on your own computer, vs on the cloud), we encourage you to explore the difference between relational and non-relational databases. Since there are already several informational articles available, we won't redundantly discuss it here, but any self-respecting developer should understand what each type is and the use cases it is best for. Here are some articles to start with - read one or two, and then proceed to setting up Mongo.
Let's install MongoDB. Depending on your operating system (OS), installing MongoDB varies:
To install mongoDB, execute the following command:
$ sudo apt-get install mongodb -yThe -y option simply prevents a prompt for the user to accept installing the package, by answering Yes to all prompts.
MongoDB installs two commands that we are now able to use: mongo and mongod. Mongo is a shell (like the Terminal we are using to execute all the commands we execute) in which we can interact with local mongo databases stored on our device. Mongod is a daemon - a service that runs in the background. Mongod pretty much listens to mongo requests from our localhost as well as other (remote) users that may be requesting from the database on our (local) device. We need to have the mongo daemon (mongod) running as a service. Luckily, by default, it is installed and configured to be a service upon startup.
With the installation complete, let us verify if the installation was successful. Execute the following command to check version mongod:
$ mongod --versionNow we check the version of mongo by executing:
$ mongo --versionIf you get an error along the lines of mongod or mongo does not exist or command not found, the installation may have failed.
To use MongoDB, we need the mongod service running. (Ideally in the background so we do not have to see it or worry about it). Then we use mongo - either the mongo shell explicitly (as we will see in a moment), or using some library (what is often done).
By default, Mongod is automatically configured as a service on the Raspberry Pi (very convenient). That is, upon start up, mongod will automatically be started in the background.
Thus, we should be able to directly use mongo. Let us start the mongo shell by executing the following command:
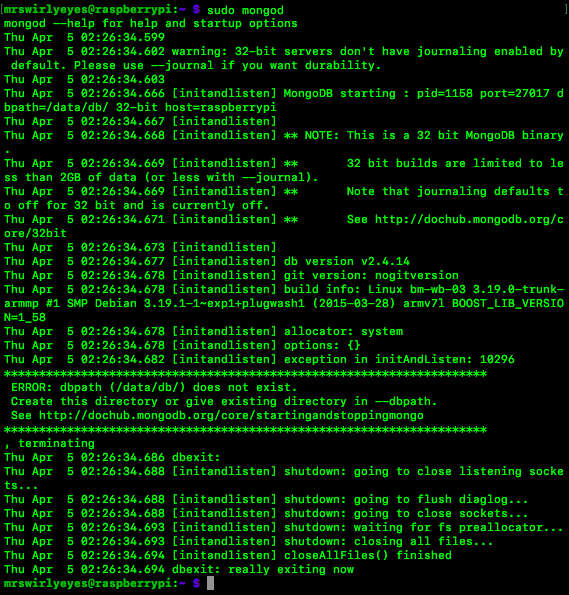
$ mongoObserve, we get an error. Let us assume, perhaps, mongod is not running by default. (Mongod was actually started, except there was an error that we could not see - we will expose that error now).
To start mongod, execute the following command:
$ sudo mongod
Observe, we tried to start the mongod daemon (or start mongod) and it failed. The error that was rasied:
Great, it told us the error was that the database path: /data/db/ with the directory db/ does not exist. Let us create this path + directory by executing the following command:
$ sudo mkdir -p /data/db
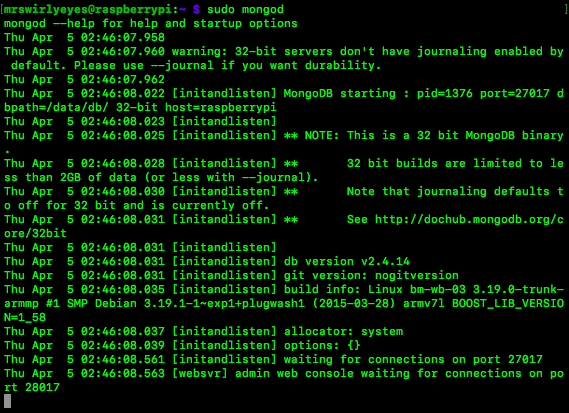
Now let us try to run mongod again:
$ sudo mongodThis time mongod did not throw an error and exit!
Observe that the command line interface (CLI) hangs while the mongo daemon is running - to exit press ctrl + C
Terminate the mongod process by pressing ctrl + C.
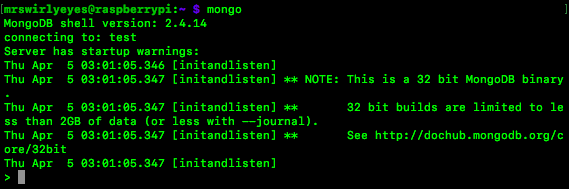
Now let us try to start the mongo shell again:
$ mongoThis time the mongo shell launched successfully! We received a warning, but we can ignore this. We are given a prompt symbol, and can send commands to the mongo shell. We will not practice any in this module.
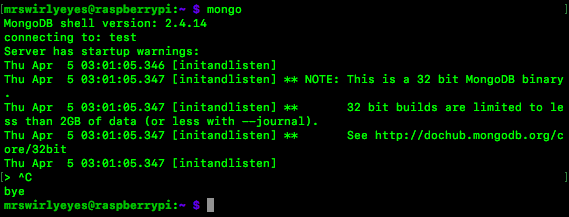
Observe that you are stuck in the mongo shell. To exit the mongo shell press ctrl + C
You may exit the mongo shell by pressing ctrl + C
If the mongo shell runs, then the mongo installation onto the Raspberry Pi was successful!
Linux operating systems are excellent for programmers because they come with a package manager, which allows developers to install tools without all the clicking around of downloads and installers. Mac does not natively have one, but some lovely people at brew.sh created one. It simplifies installation of many popular development tools, so we use it here - if you already have it installed, then carry on. Otherwise, jump over there and follow the instructions to install it. Afterward, we can use it to install mongoDB.
Their install instruction (yeah, there's only one! Nice, right?) requires the Terminal, which is a preinstalled Mac application that provides a CLI (Command Line Interface) to the machine. To open it, you can either find it in your applications folder or use Mac's Spotlight tool. Get used to Terminal - you'll be using it a lot in this tutorial and the projects that jump off of it.
If you have an old installation (I think that the milestone was updating to High Sierra), Homebrew lost permission to edit the /usr/local file, so all installs will fail. If you get a Permission Denied error at the end of any install, you'll have to uninstall and reinstall Homebrew. Their FAQ has the uninstall command: Homewbrew FAQ
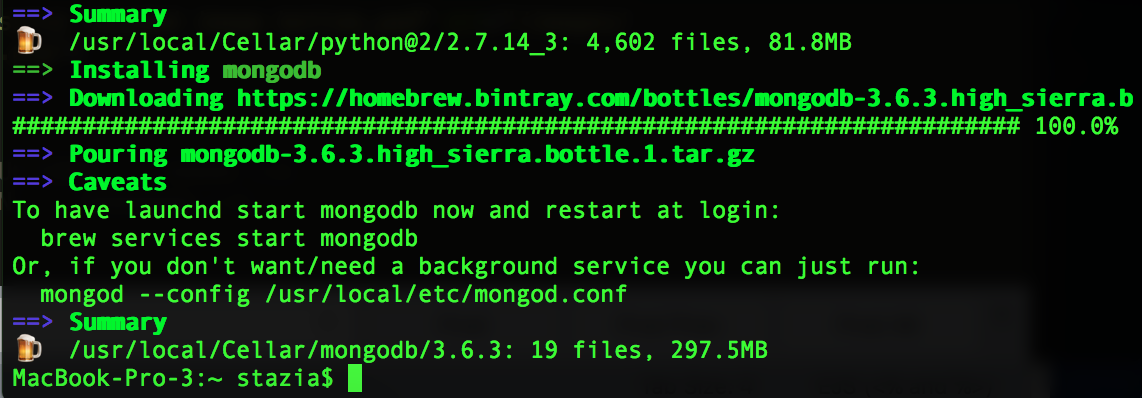
So, Homebrew's ready? Great. This'll be easy.
Type
$ brew install mongodbNow, you have to create a place for mongo to store your databases, and it looks for a special folder, so type
$ sudo mkdir -p /data/db
To use MongoDB, we need the mongod service running. (Ideally in the background so we do not have to see it or worry about it). Then we use mongo - either the mongo shell explicitly (as we will see in a moment), or using some library (what is often done).
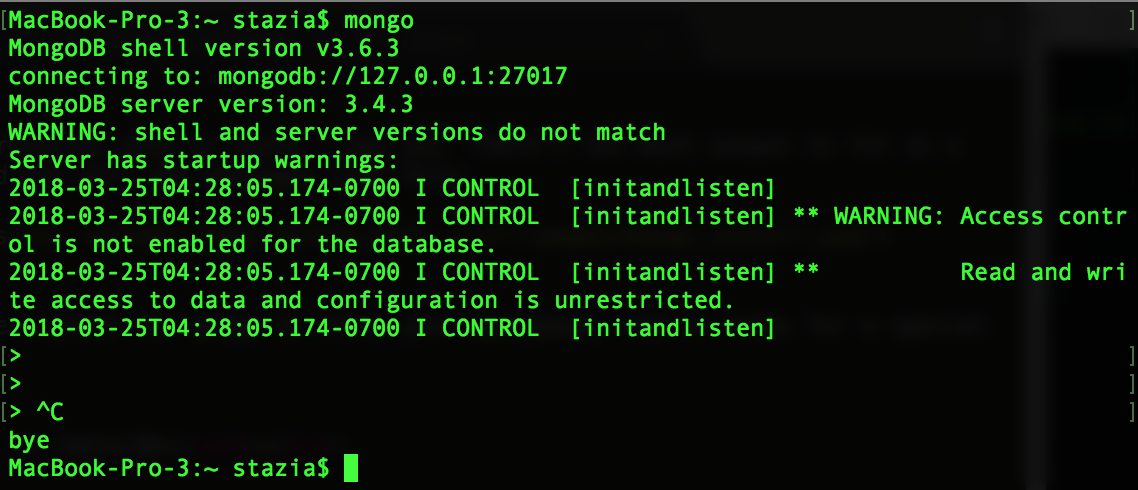
Homebrew configures the mongod service to start in the background when you turn the computer on, so we should be able to directly use mongo. Let us start the mongo shell by executing the following command:
$ mongoIf you encounter an error starting the shell, you may not have permission to edit the /data/db directory you made. Execute the line
$ sudo chown -R `id -un` /data/dbYou'll be taken to a command line (shown below), where you can create and interact with databases. However, we don't often use it this way - we usually interact with Mongo through libraries for whatever language we are programming in, and can visit the Mongo command line to check that those operations are successful.
To leave the Mongo command line, type ctrl+c. The picture below shows the interface exiting.
If the Mongo shell runs, then you are good to go!
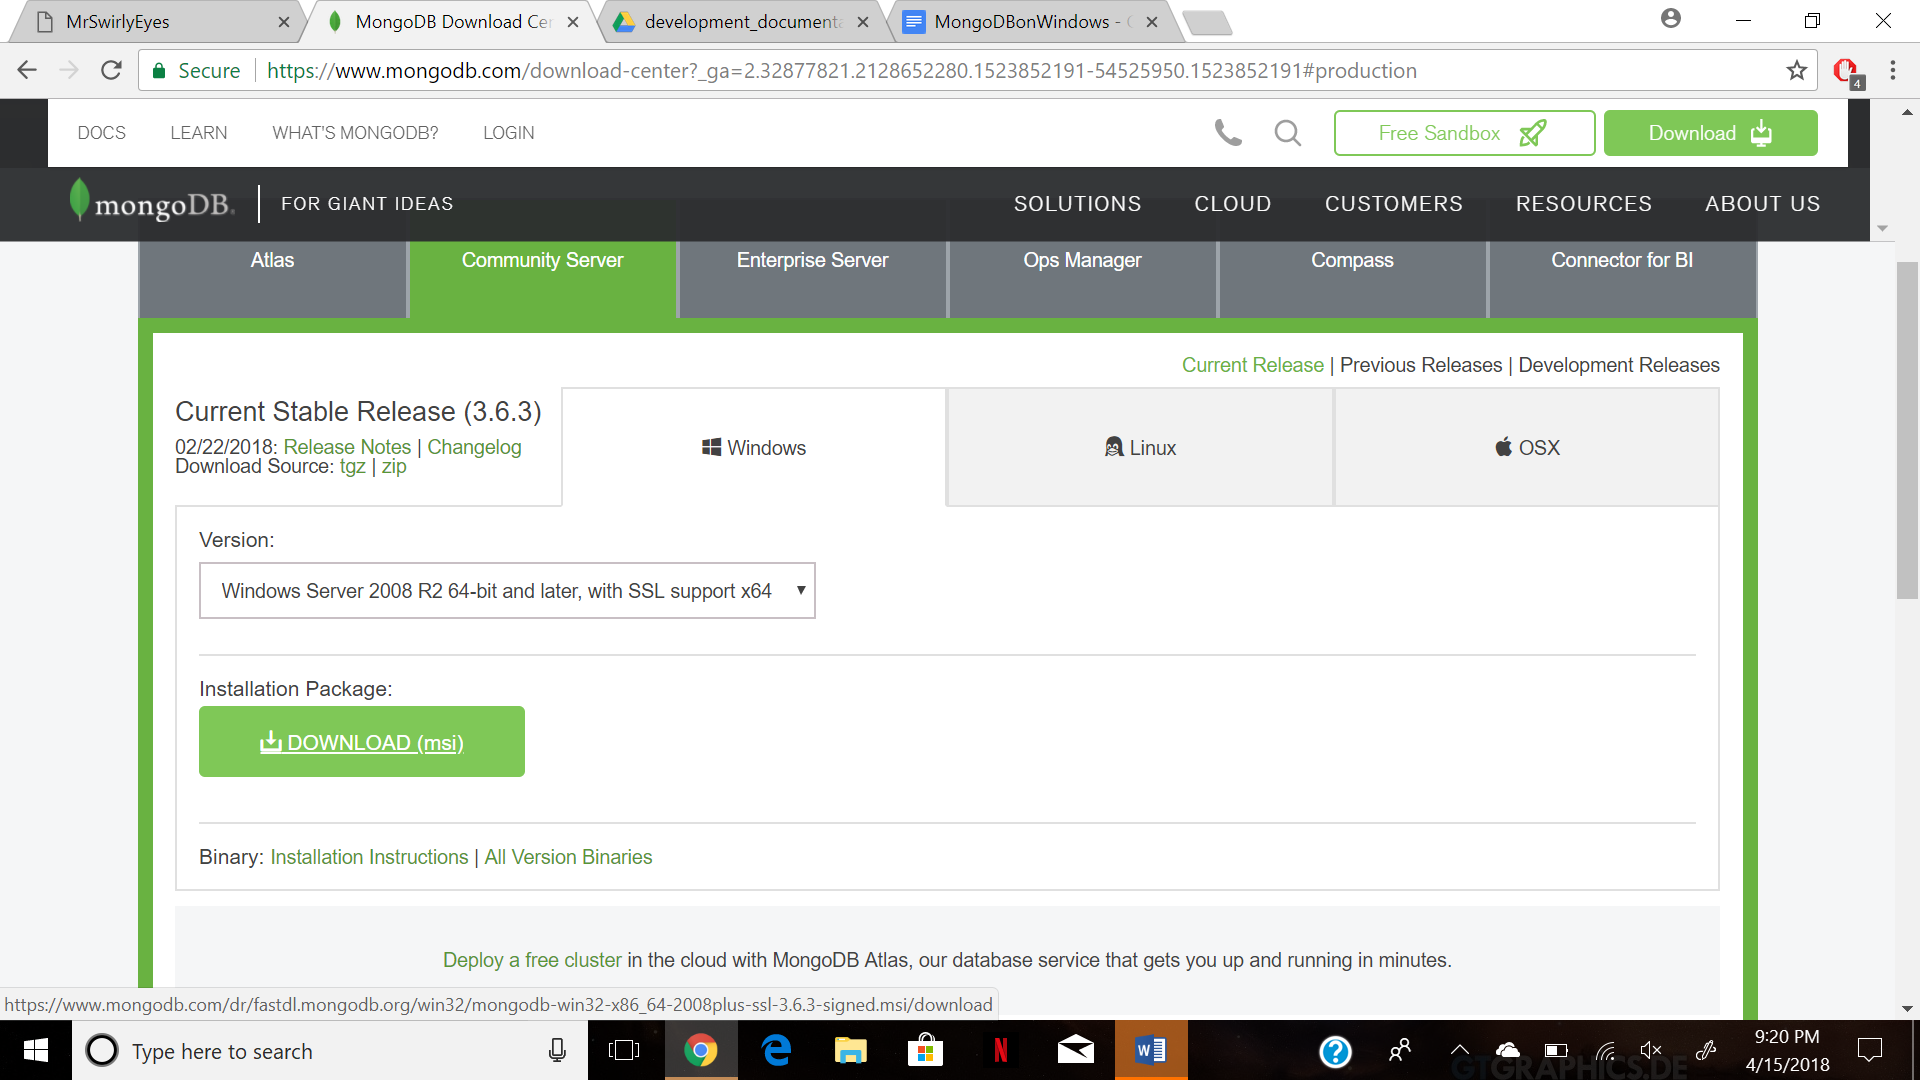
To start, visit This Link to the Mongo website and click on the Community Server tab. Download the version of the installer for your computer.
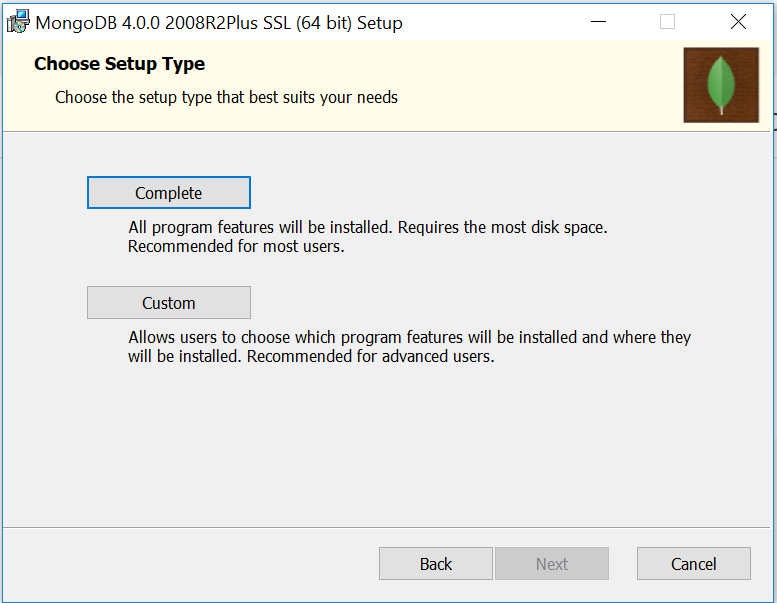
Start the installer, and follow the default instructions. Pay attention to the following 3 screens.
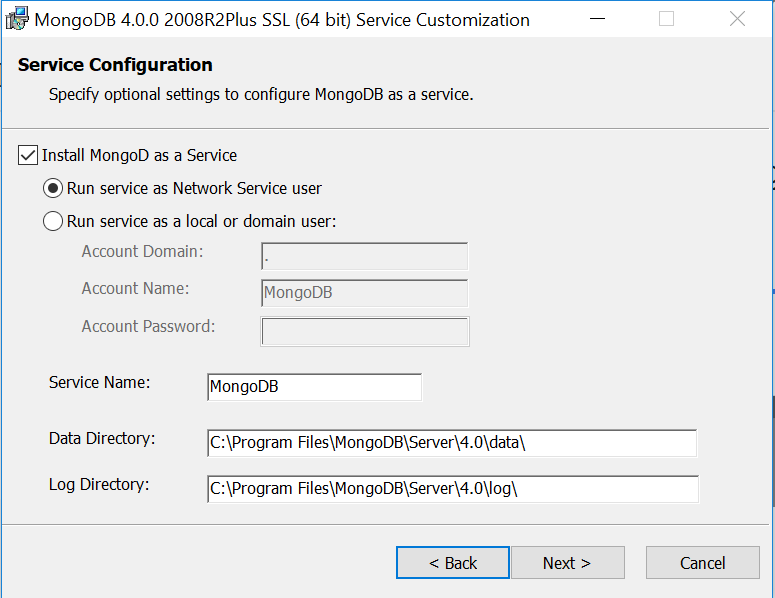
You want to click on Complete, here.
The Windows Service automates starting Mongo for you. Newly with Mongo version 4.0.0, the installer can set it up so that Mongo starts automatically when you boot up the computer, which we used to have to do manually. You can keep all the defaults - we just wanted to point out that you definitely want to keep this checked! It's a nice convenience, and if you uncheck it, you'll have to go find instructions on the Mongo site for how to actually start Mongo, or the rest of our steps won't work for you.
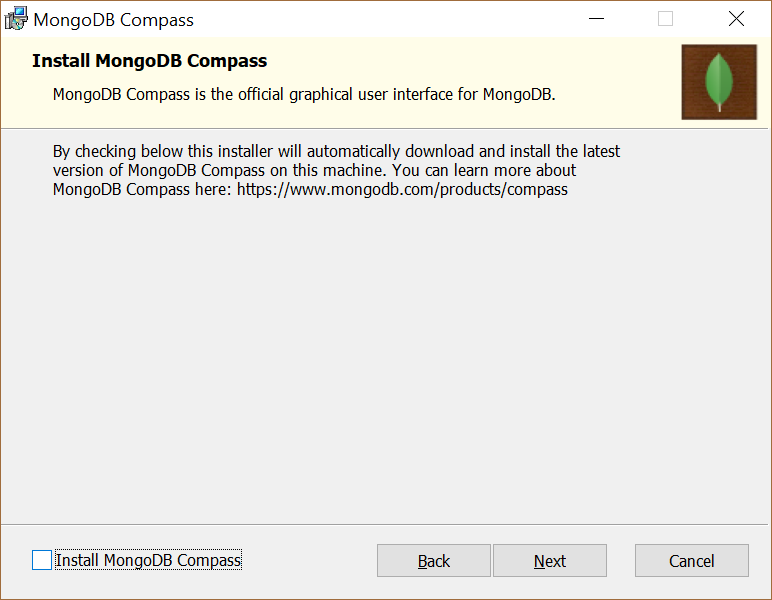
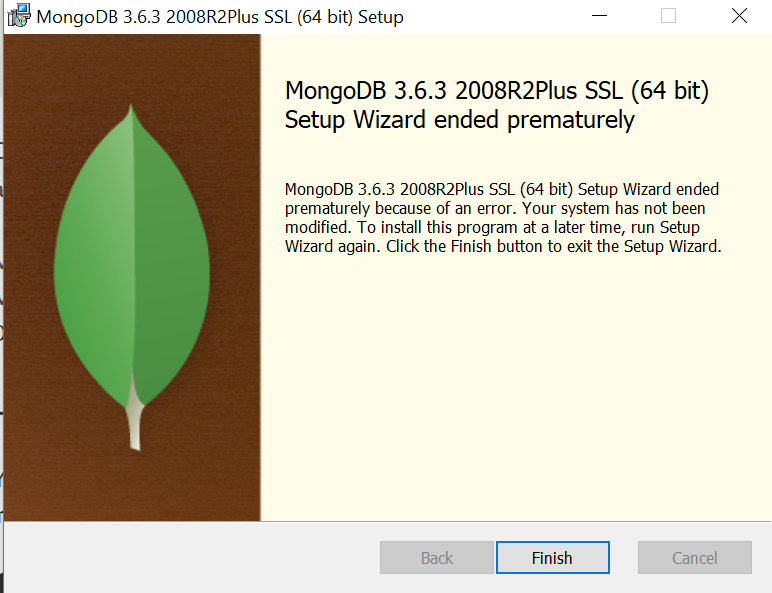
Do not install Compass. I repeat. Do not install. Electing to install Compass with Mongo will cause installation to fail, so make sure to uncheck the option in the bottom left corner before continuing.
If you forget to uncheck Compass, you will receive the screen below, indicating failure. Simply run the installer again, and uncheck Compass. All shall be well.
That should be it! The only way to really check that all is how it should be is to check the logs for the line
[initandlisten] waiting for connections on port 27017If the mongo shell runs, then mongo has been successfully installed and is working as intended! We have 1 of the 3 components that make up our webserver stack. Next we will install Node.js.
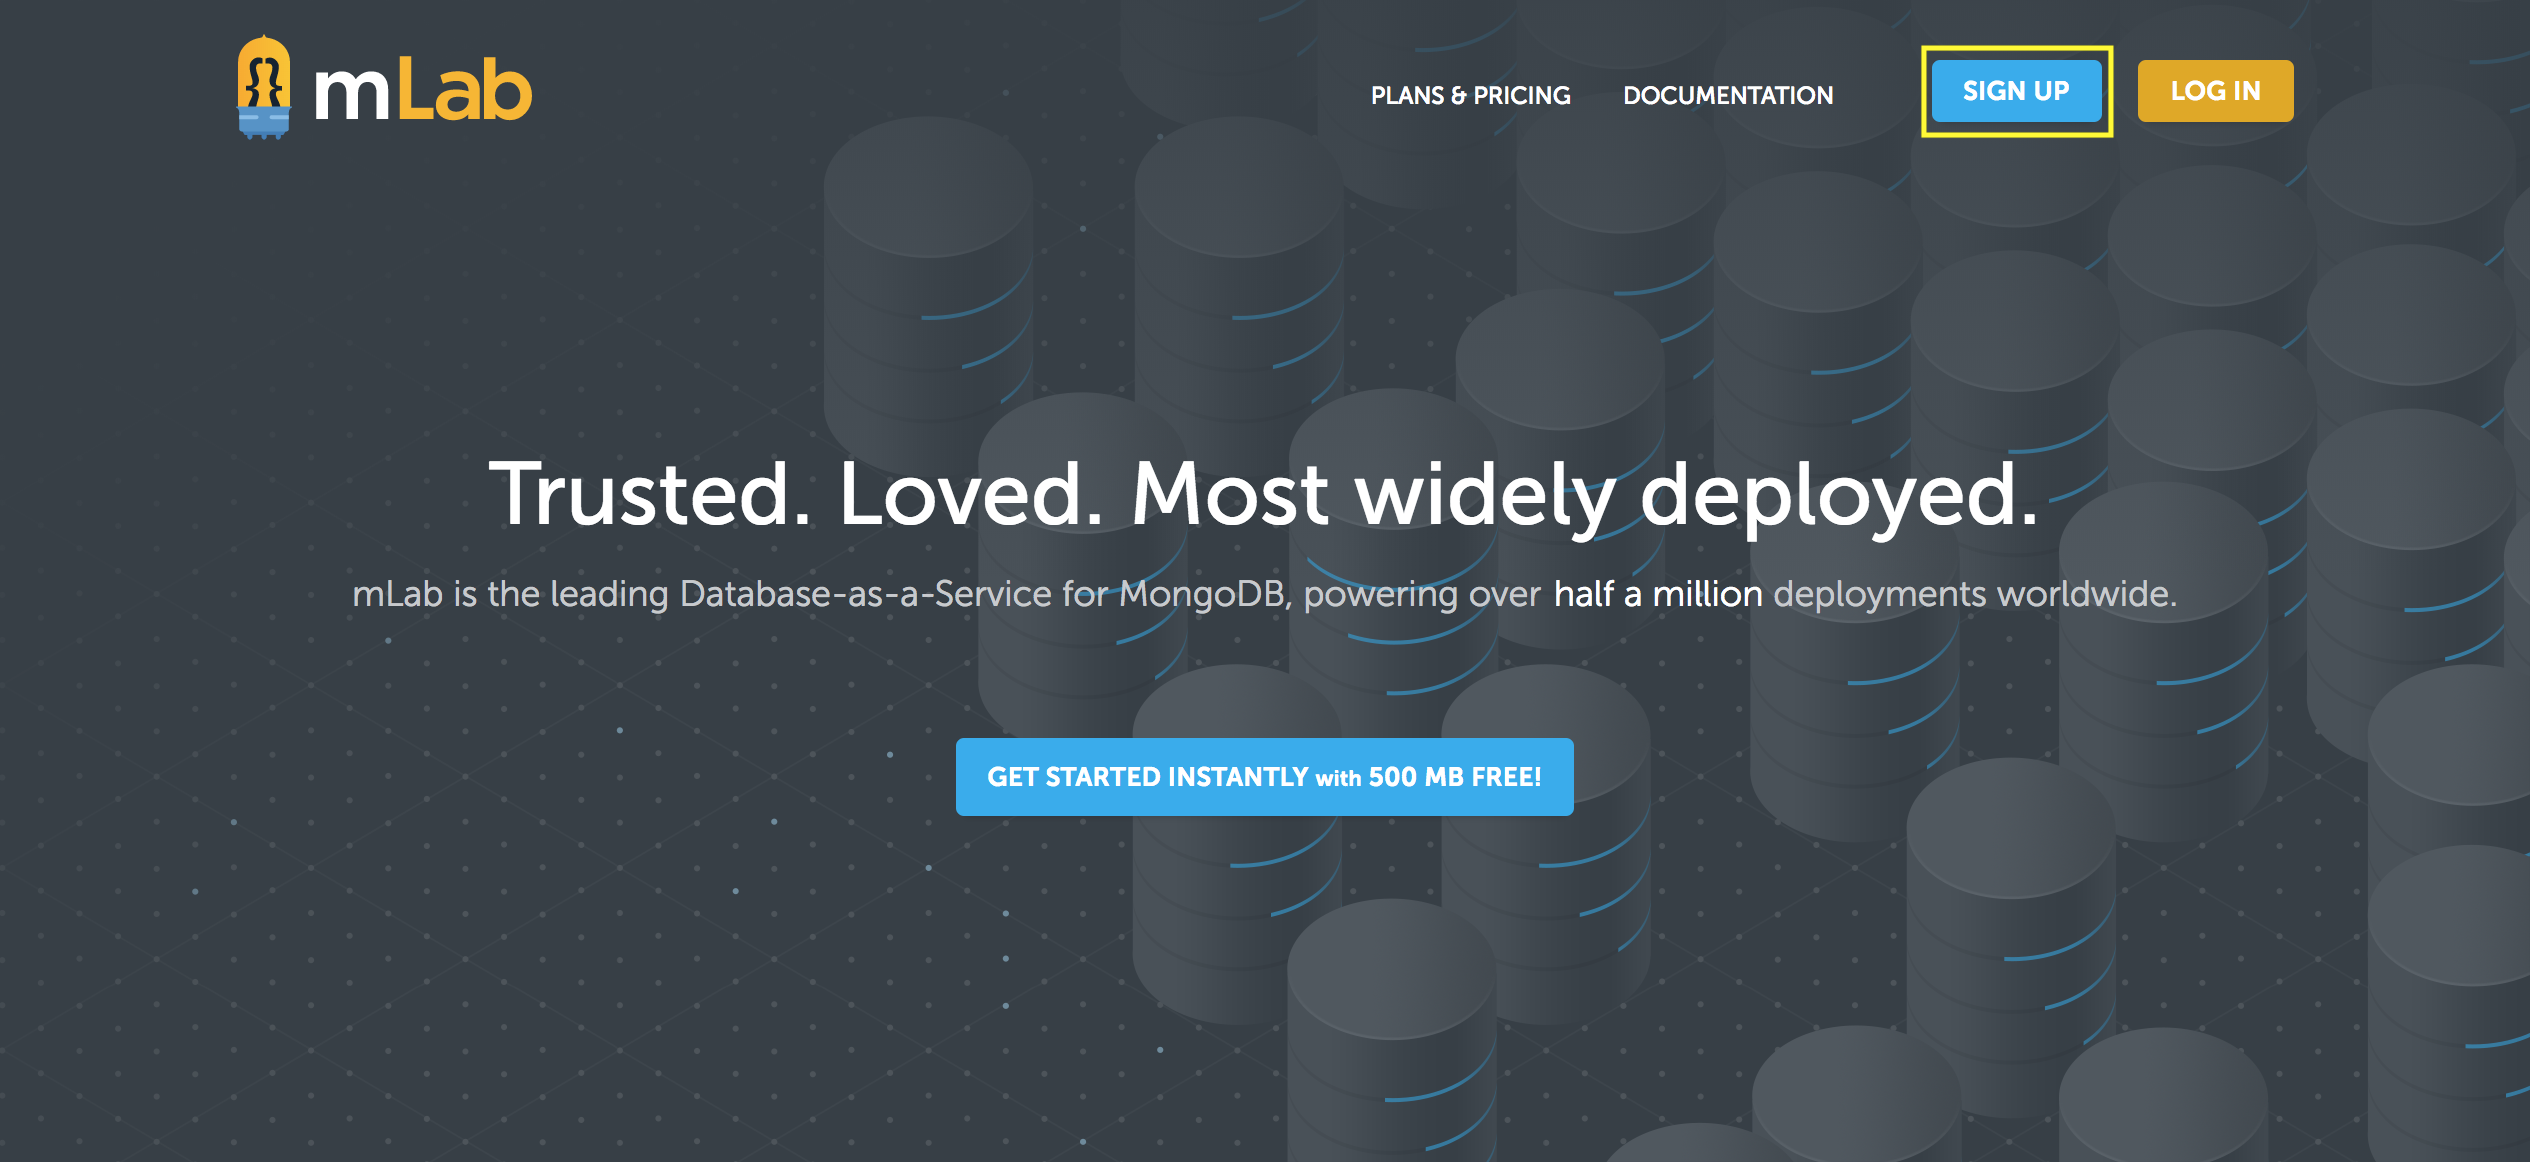
Installing MongoDB locally allows you to work in a development environment - we use local databases to work on our local host. But eventually, when we want to deploy our project to the world, we need a database available on the Cloud. In the case of a web site, many - if not all - hosting services also provide databases that you can provision to be tied directly to your web server. However, another popular option is SaaS: Software as a Service. SaaS applications embrace the programming paradigm called single responsibility principle, where we separate duties so that every component of an application is only responsible for one thing. In this tutorial, and many of our Projects, we use mLab, which is a SaaS application offering to host MongoDB databases that you can access from any programming language with Mongo support. The account you create now can host any number of databases, so you can use it for as many projects as you like. We recommend 1,000.
Navigate to mLab.com and click on Sign Up in the upper right corner.
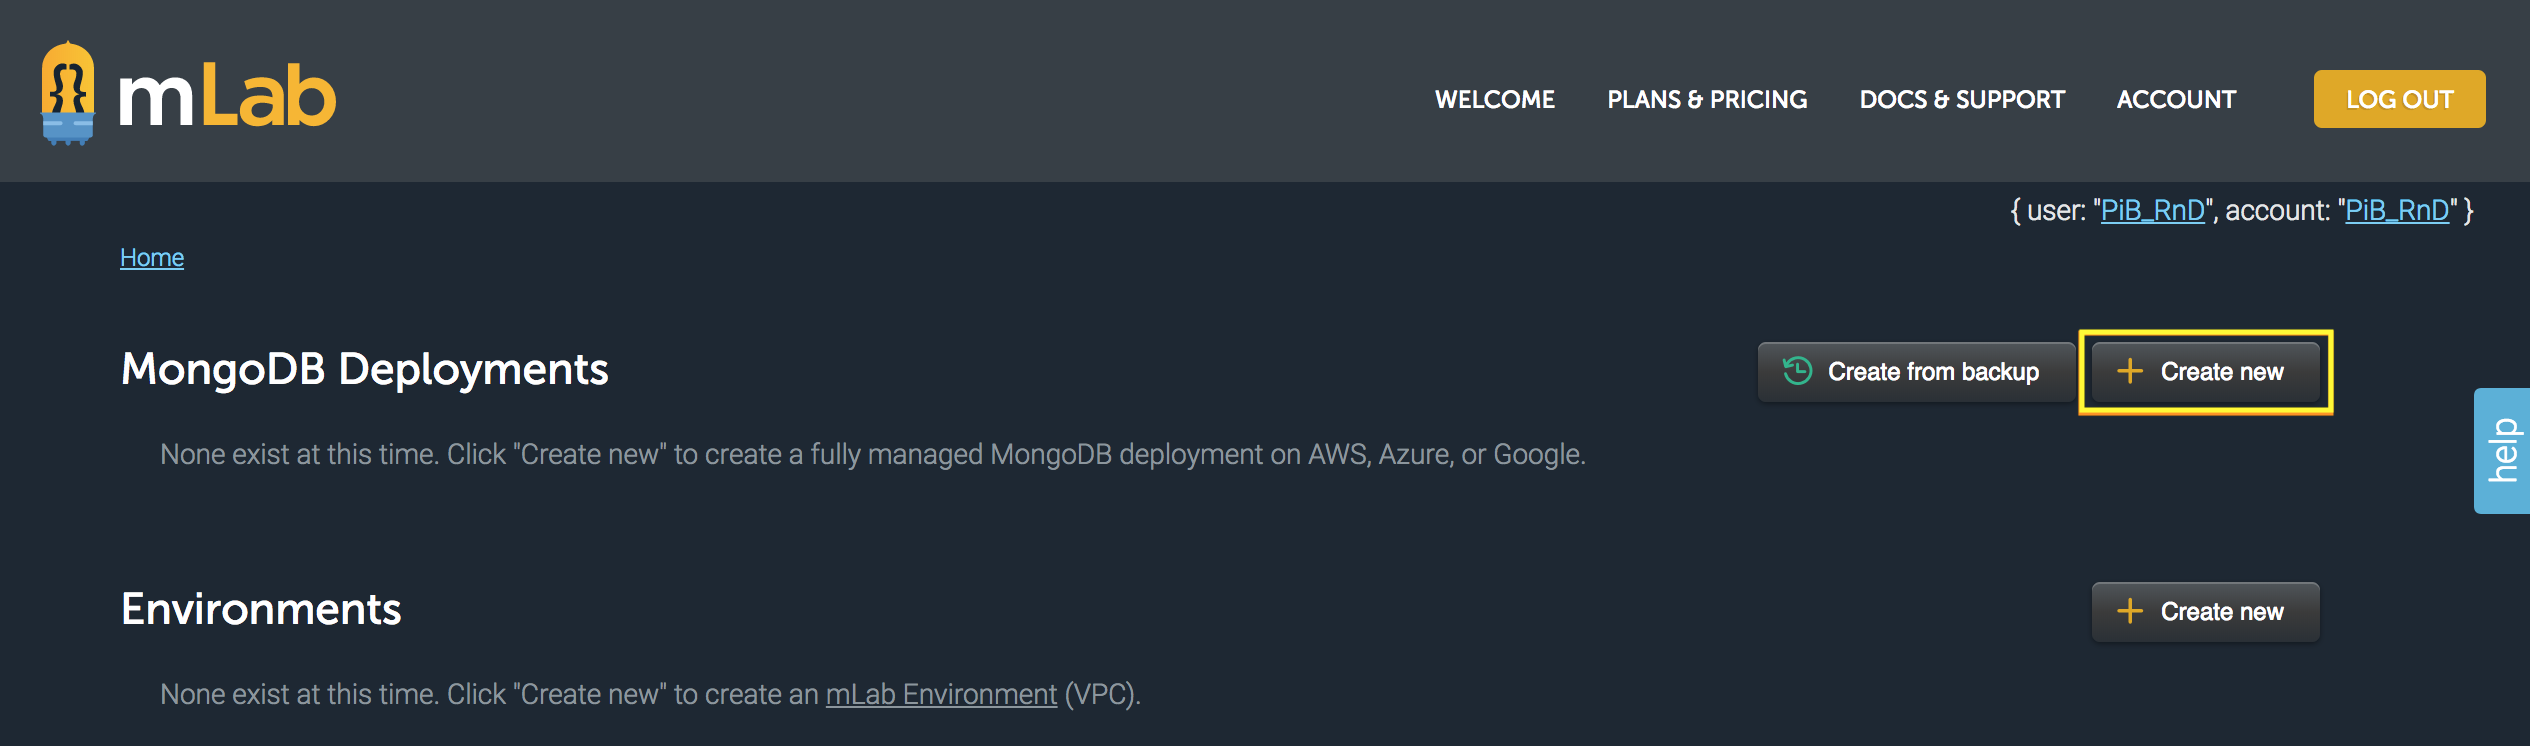
Fill out your information, and verify your account with the email they send you. When your account is ready to use, you will see a screen like this picture. Click on the upper Create New button, shown in the yellow box.
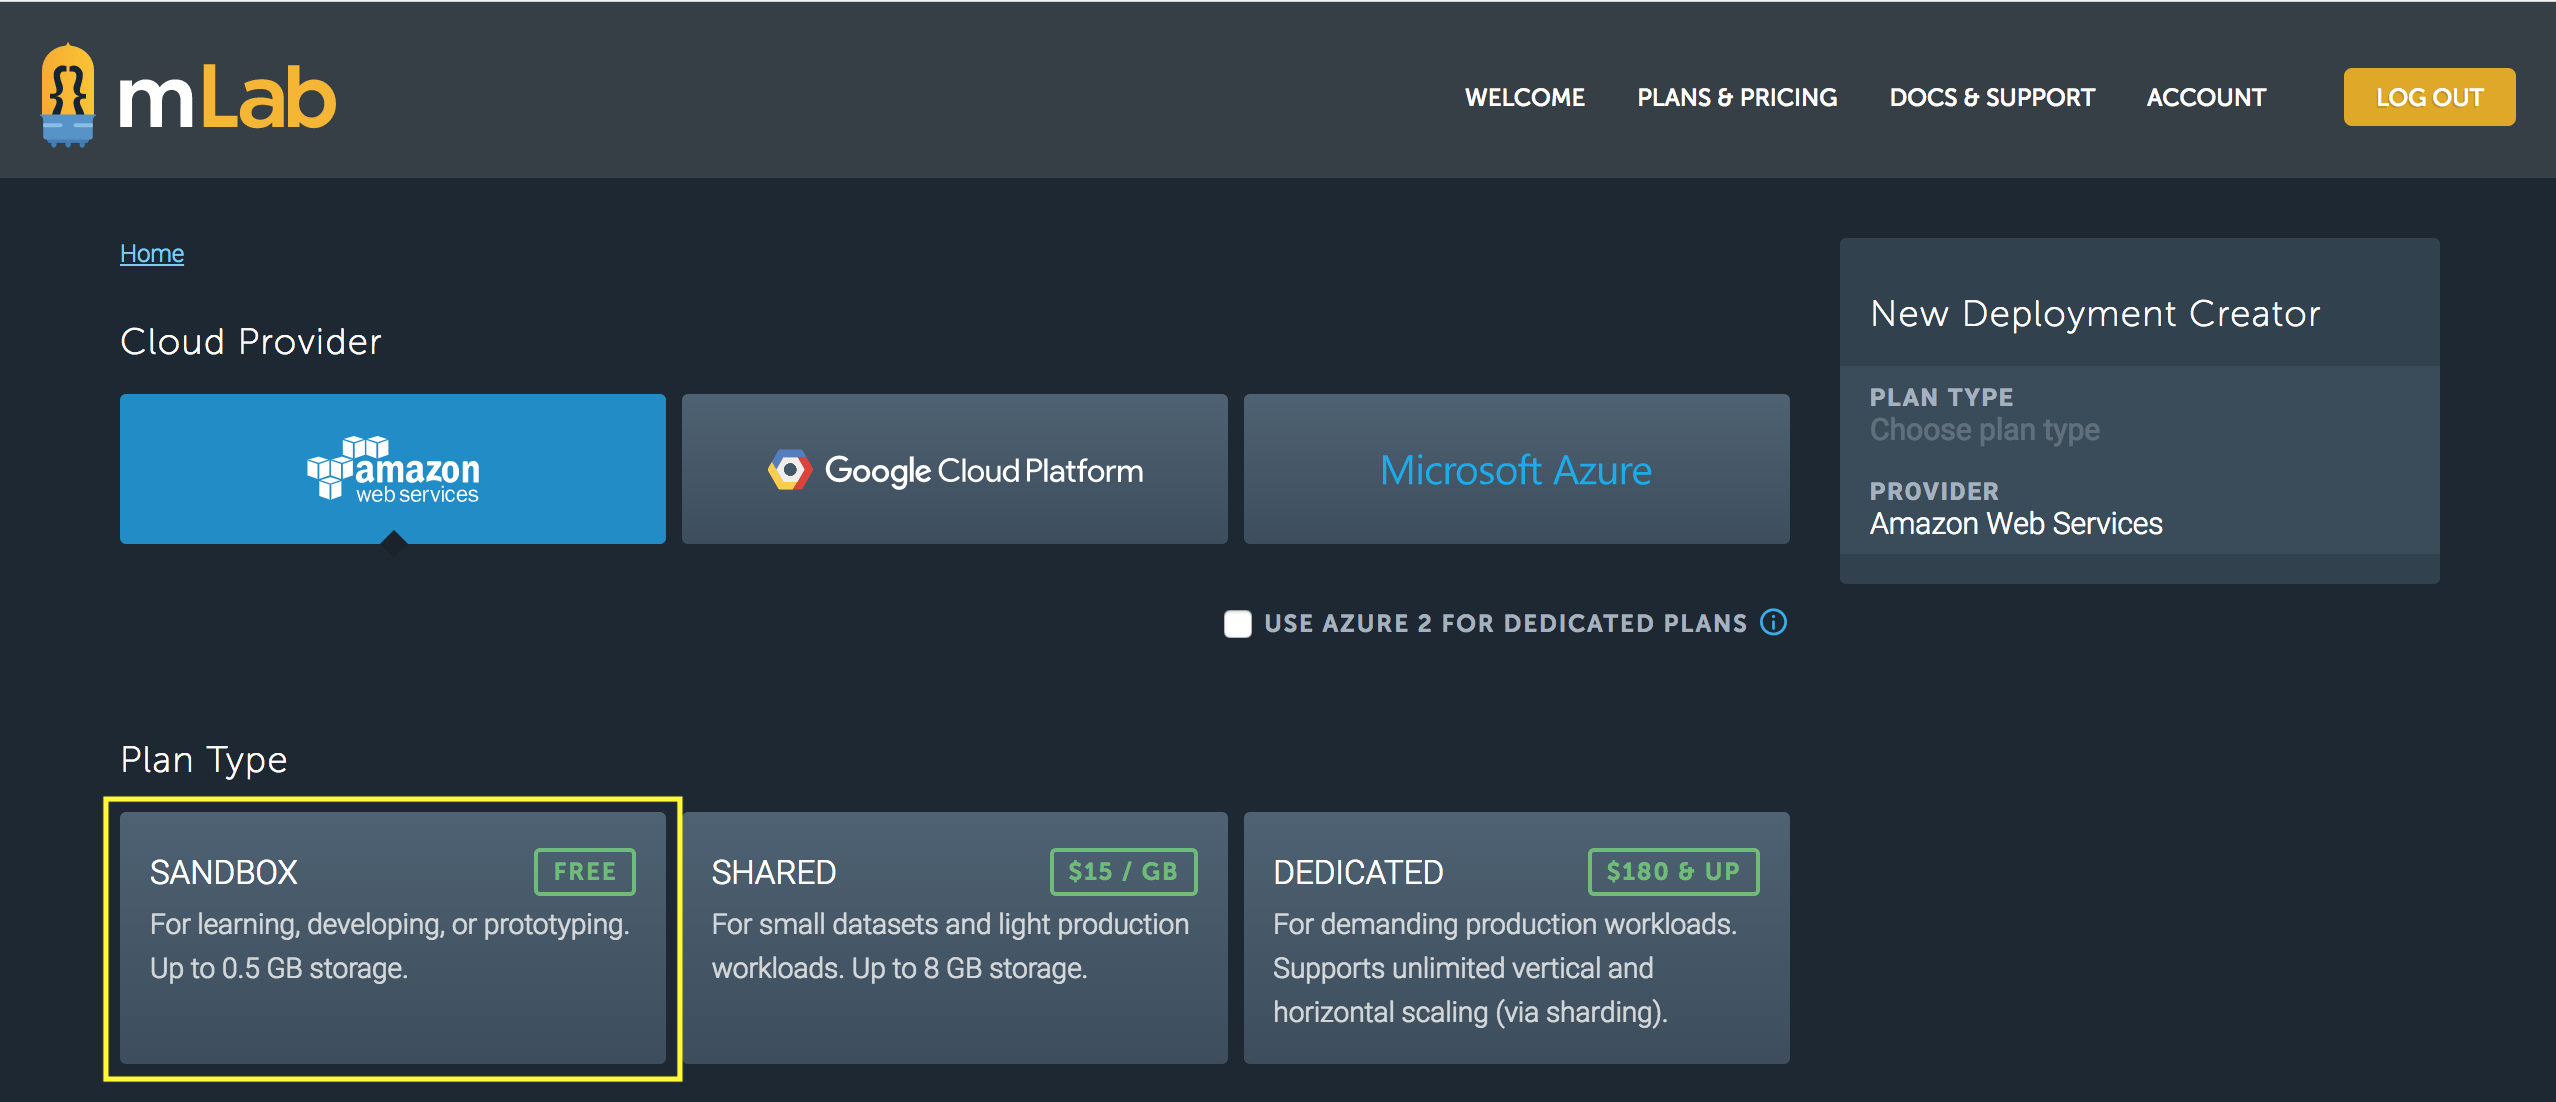
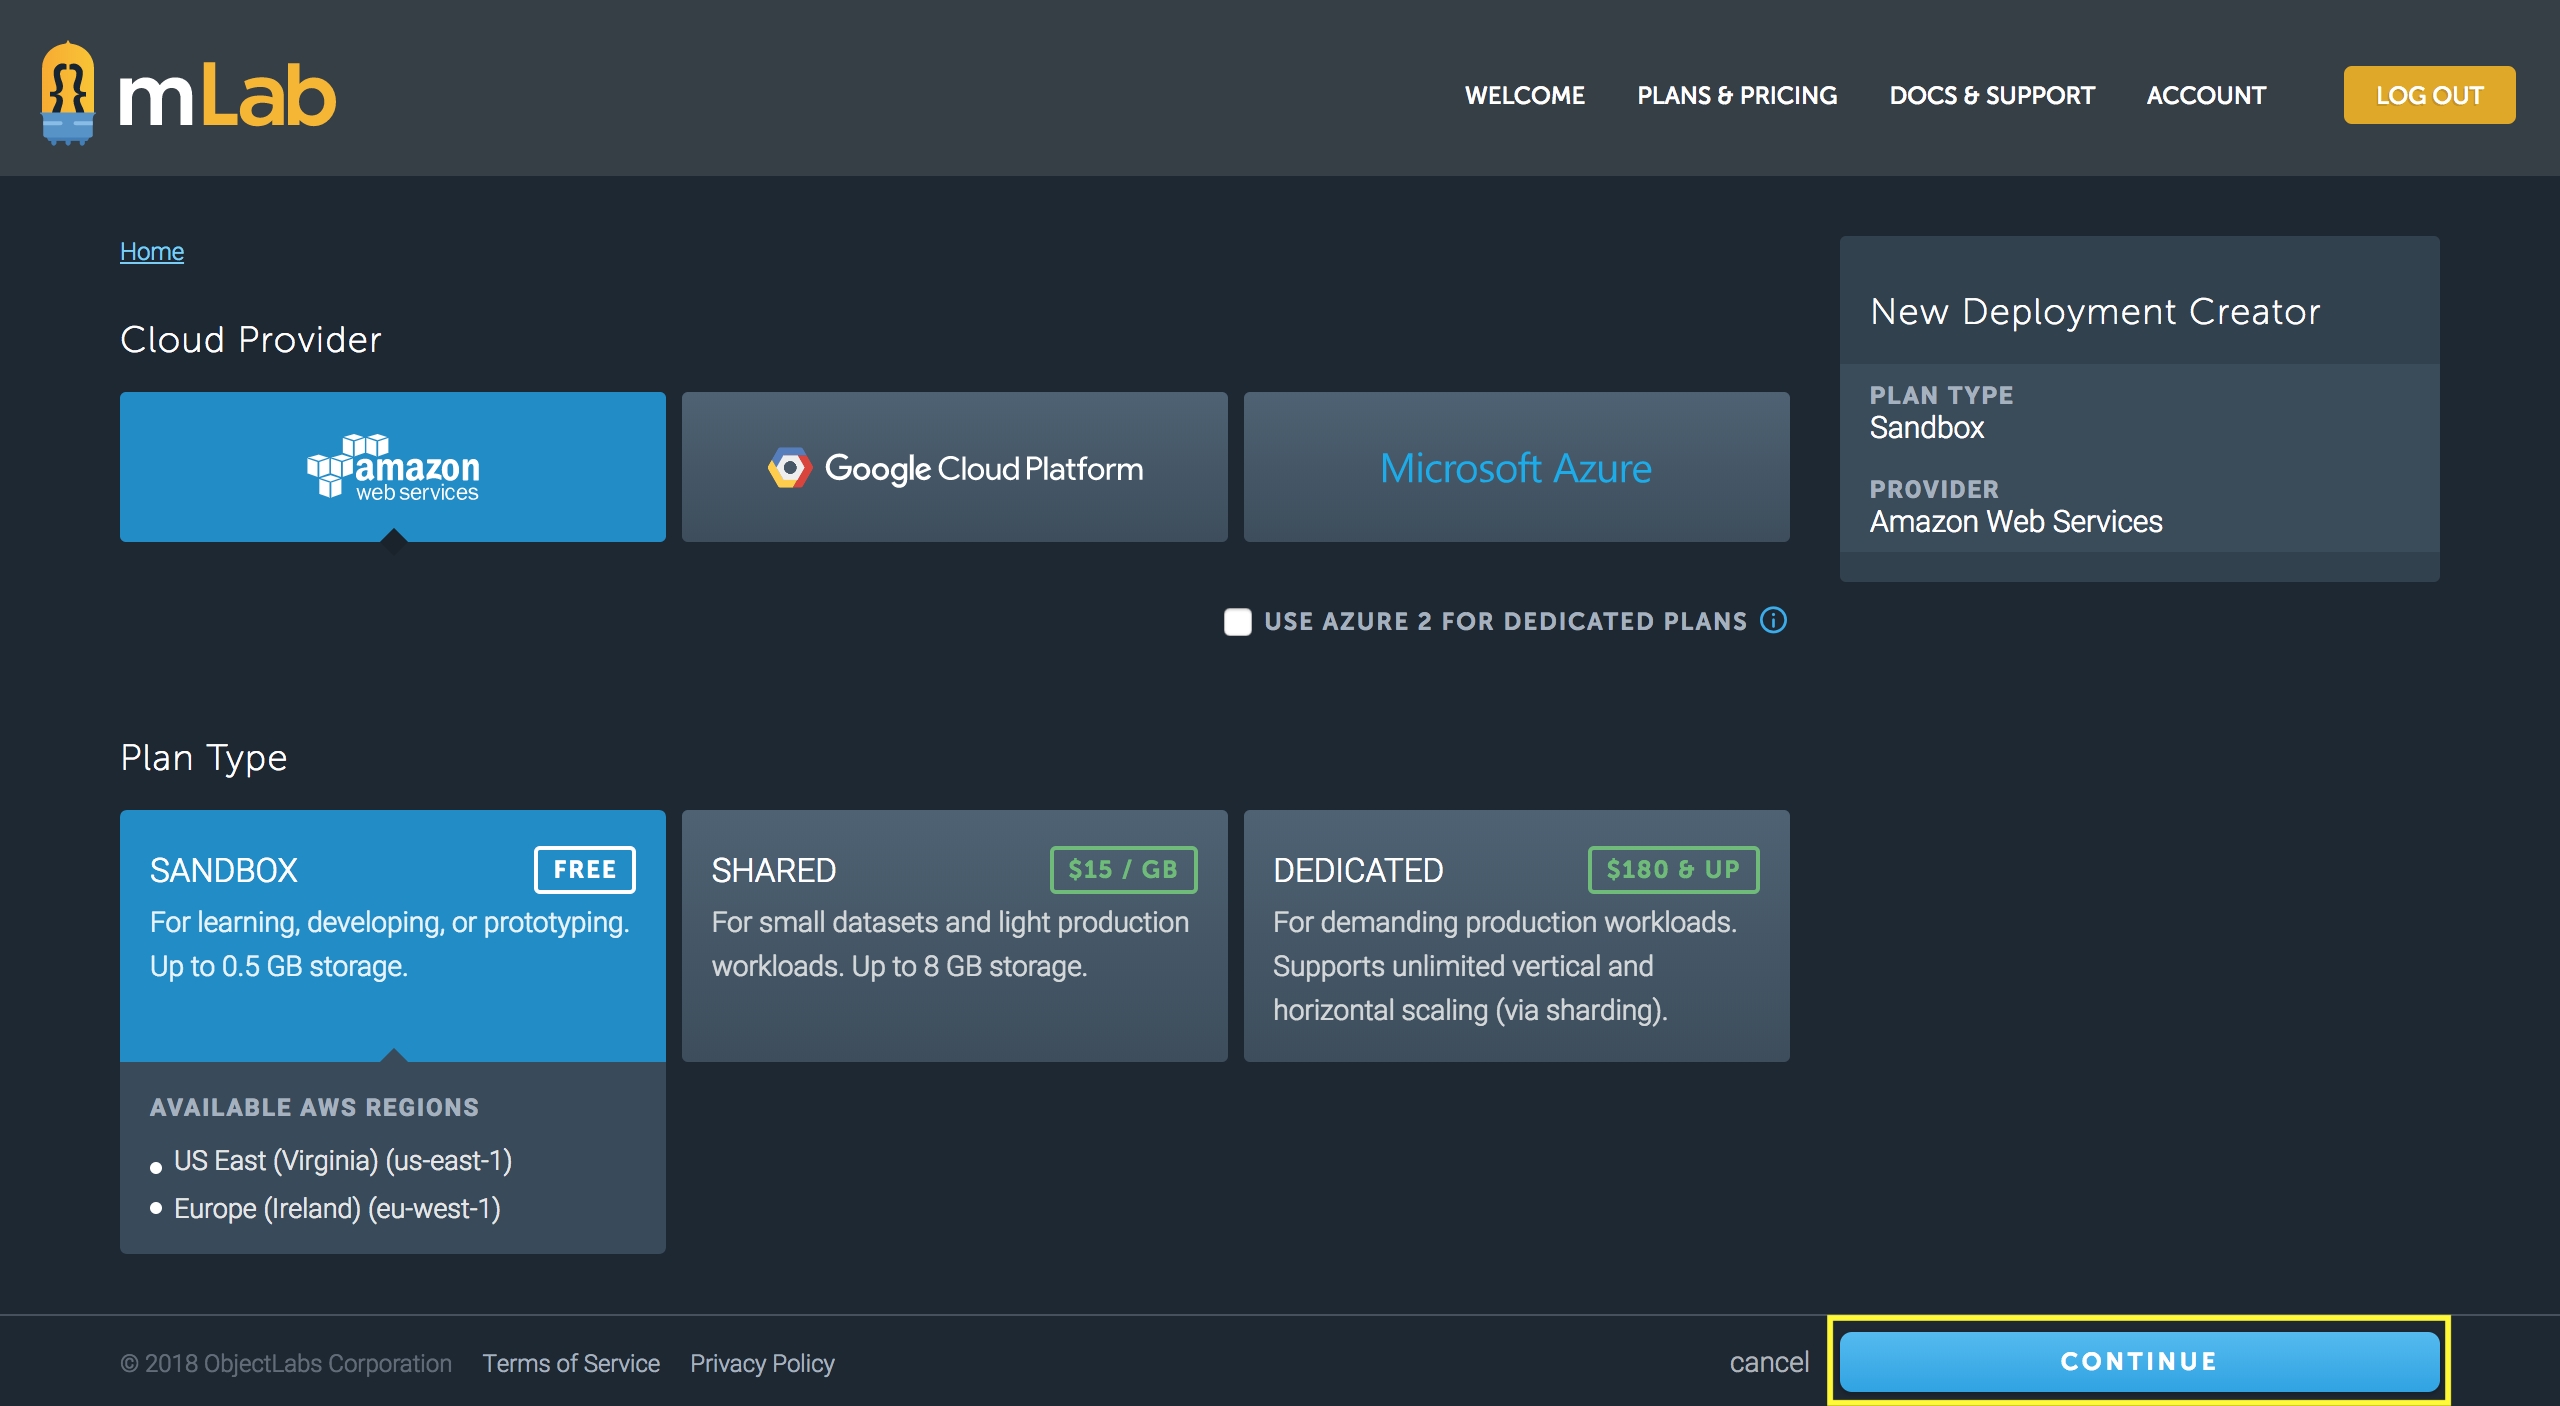
Select the Sandbox plan (y'know, the free one), boxed on the left, and click the blue Continue button that appears in the lower right.
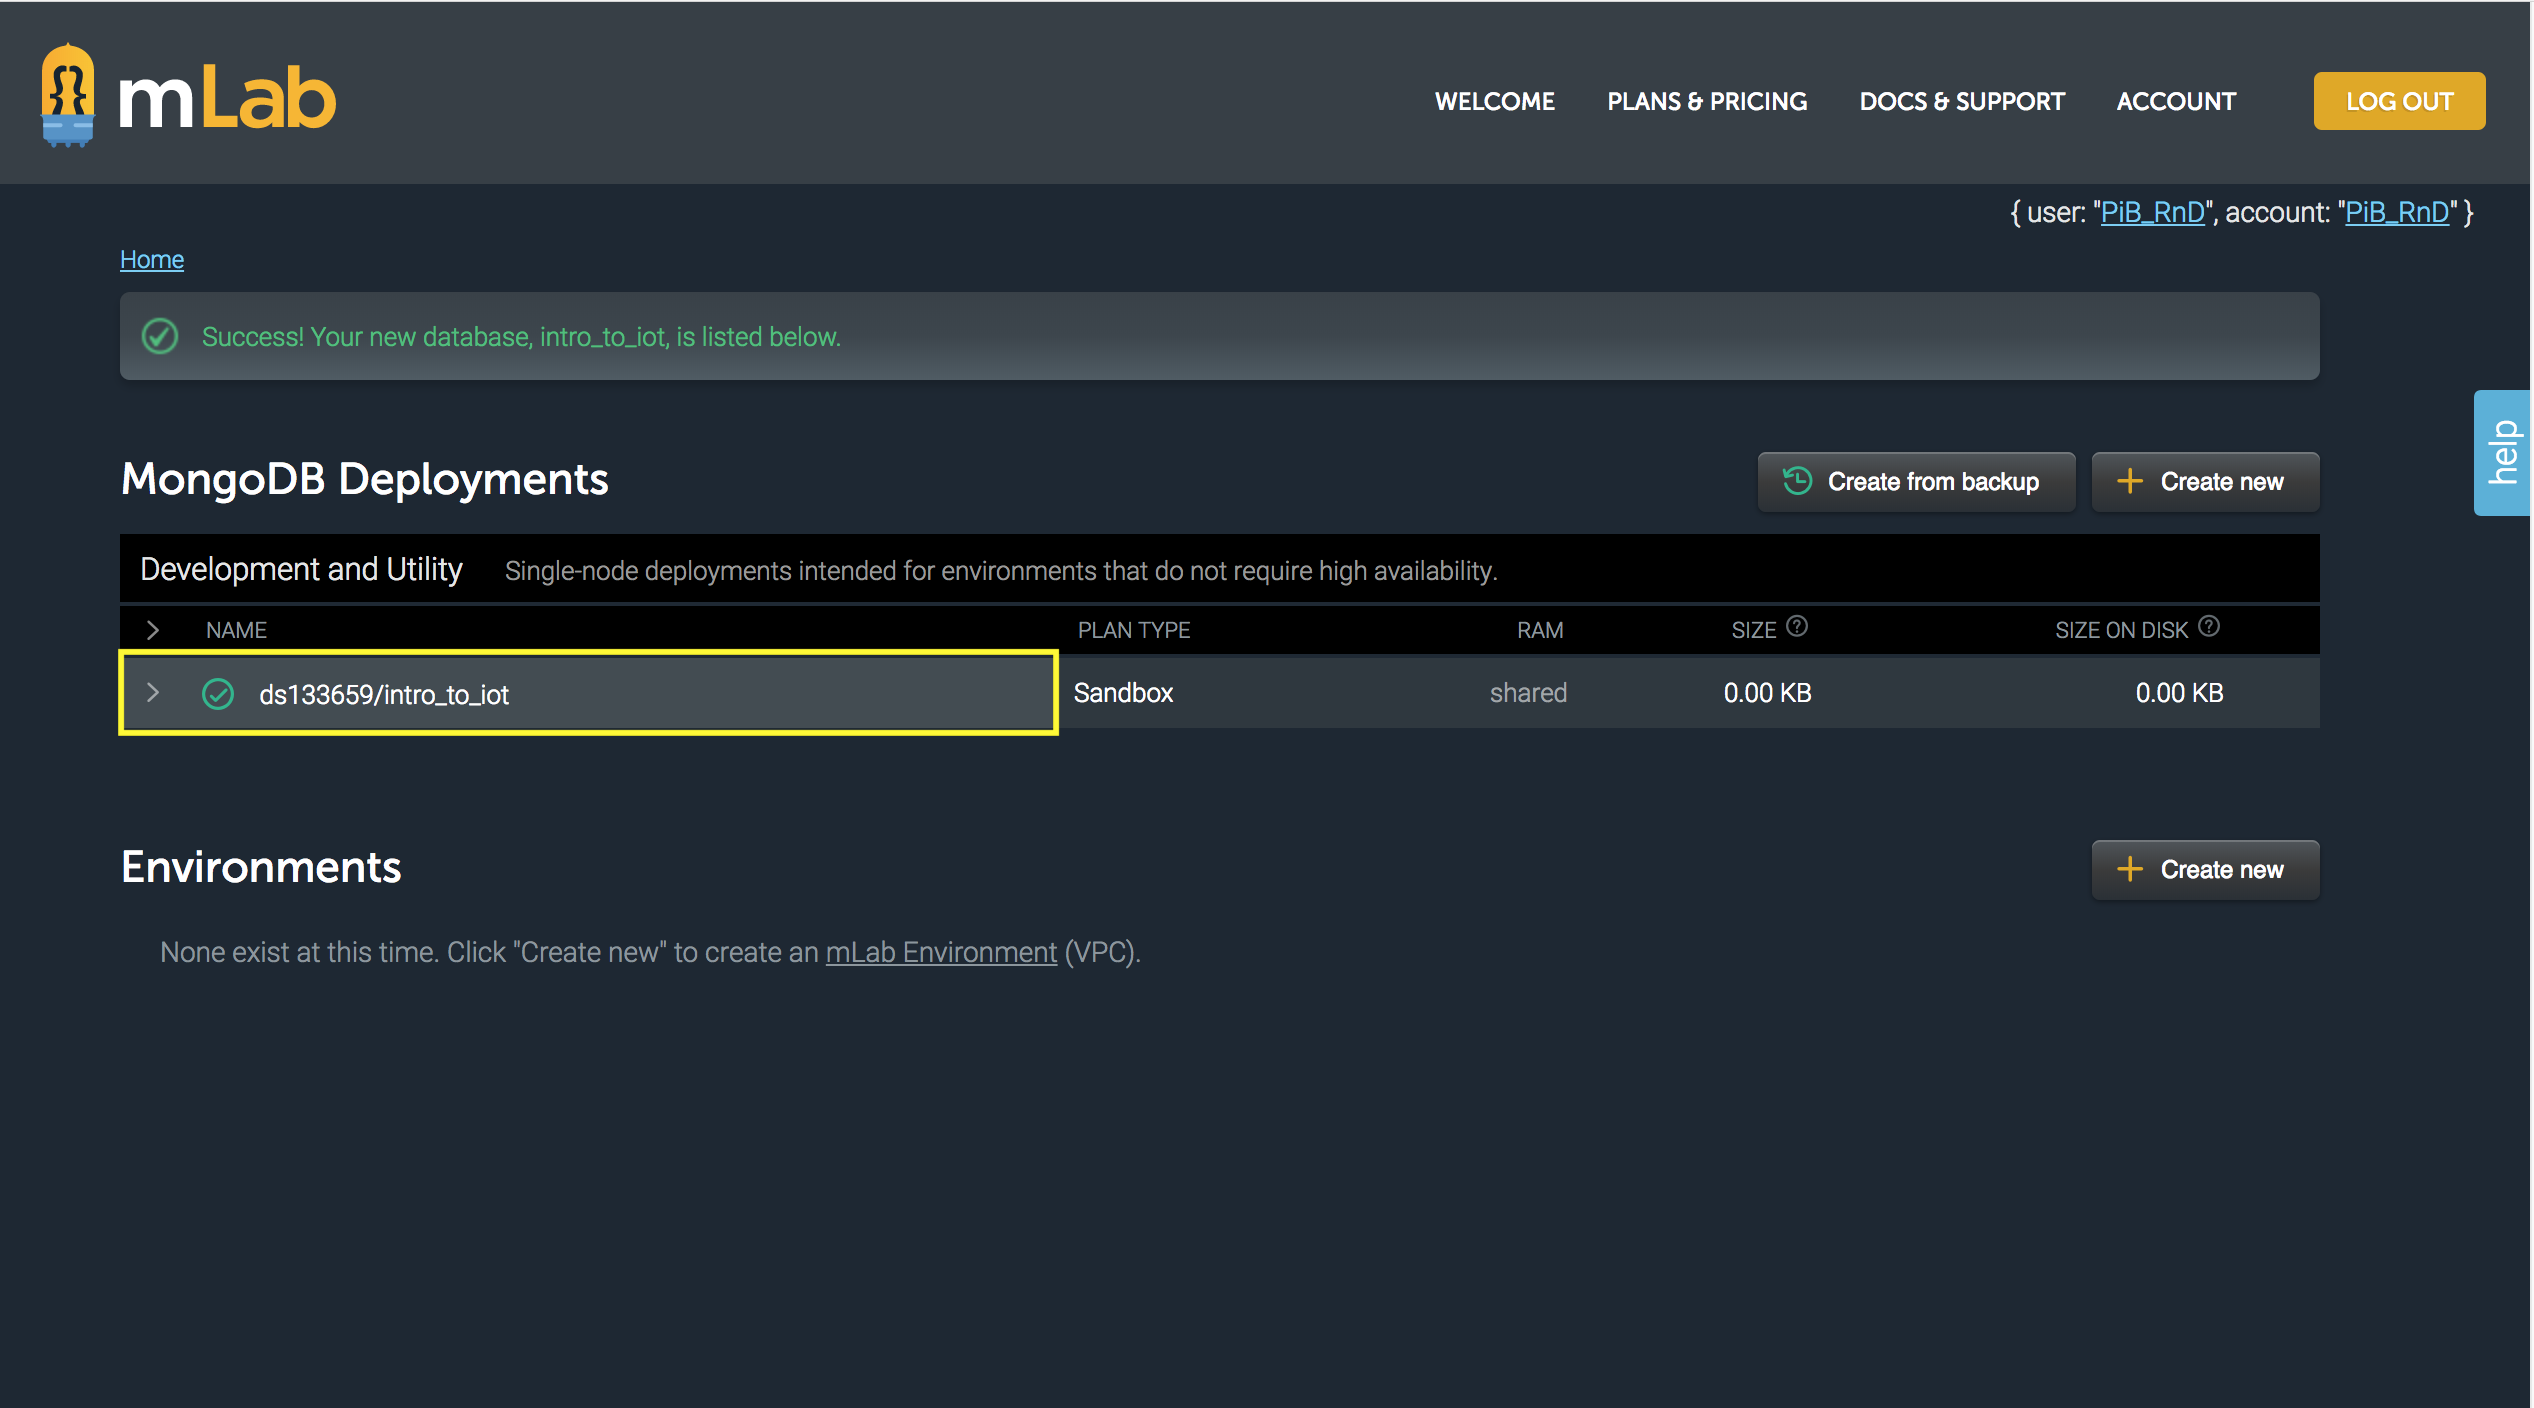
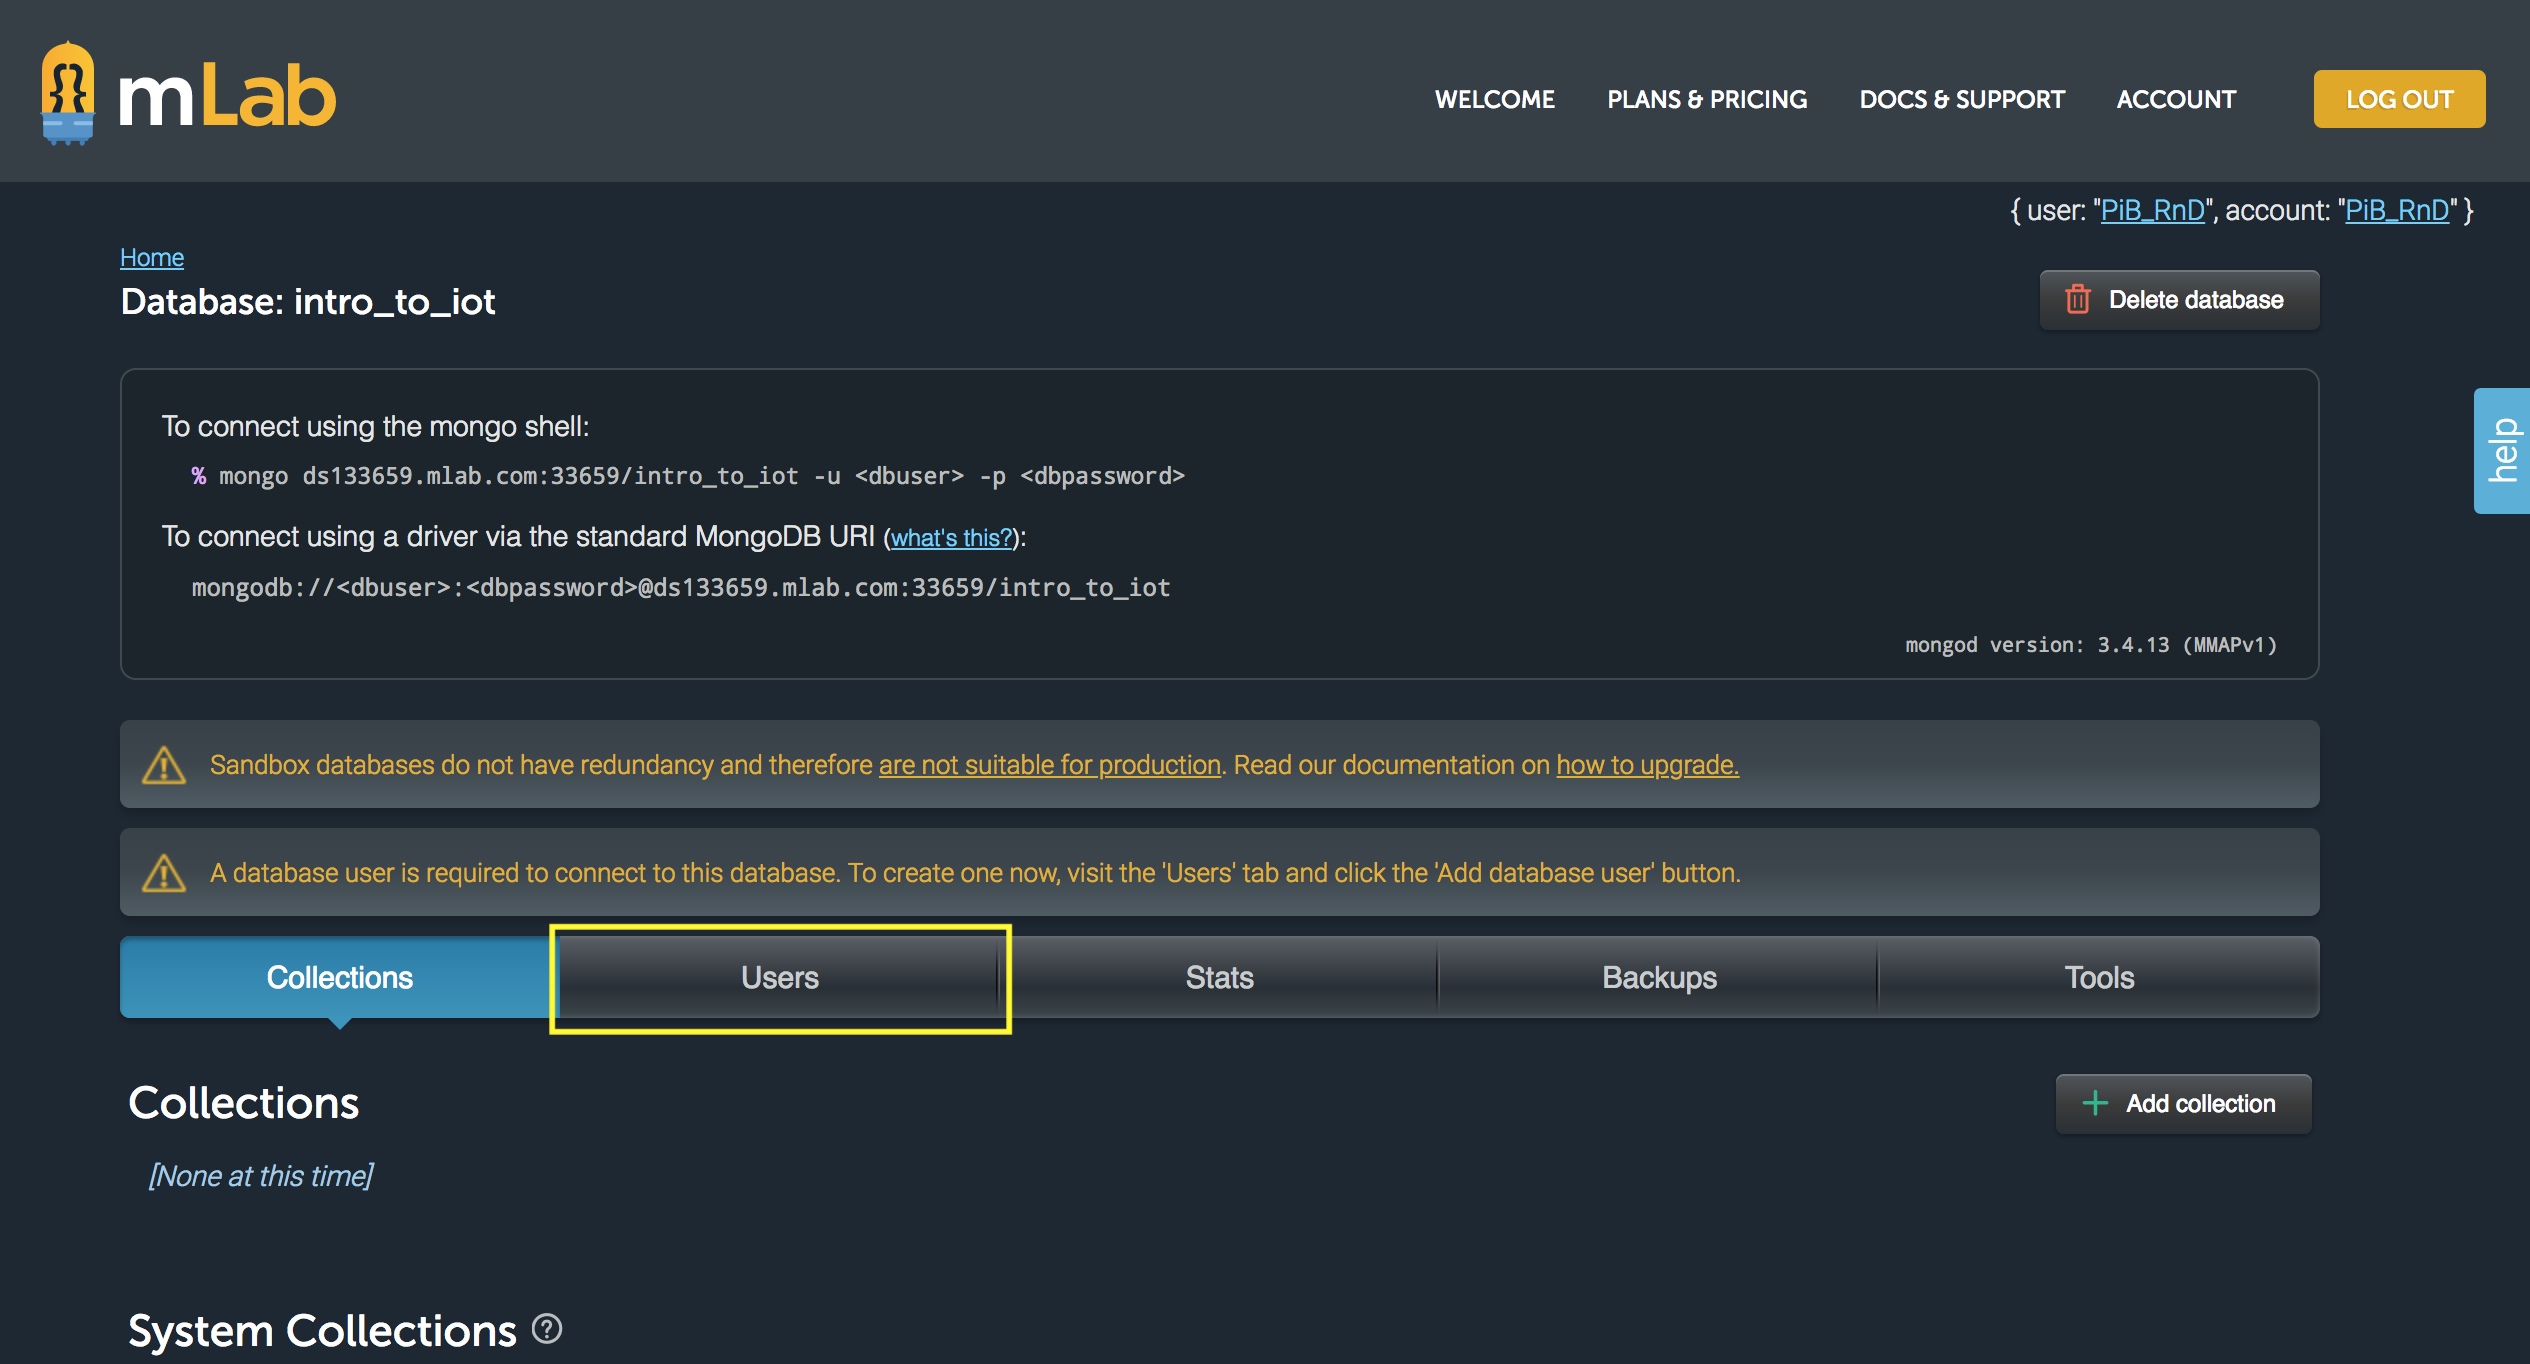
Name your database - we chose intro_to_iot - and click Continue again. After a few minutes you will see the screen on the left, below. Click on your db to enter it, which will take you to the screen on the right, which has a note about needing a User for the database. They aren't wrong, so let's make a user now. Click on the User tab.
It can take a couple of minutes to provision the db, so don't try to enter it too soon. You will see the green success note at the top of the screen when it is ready.
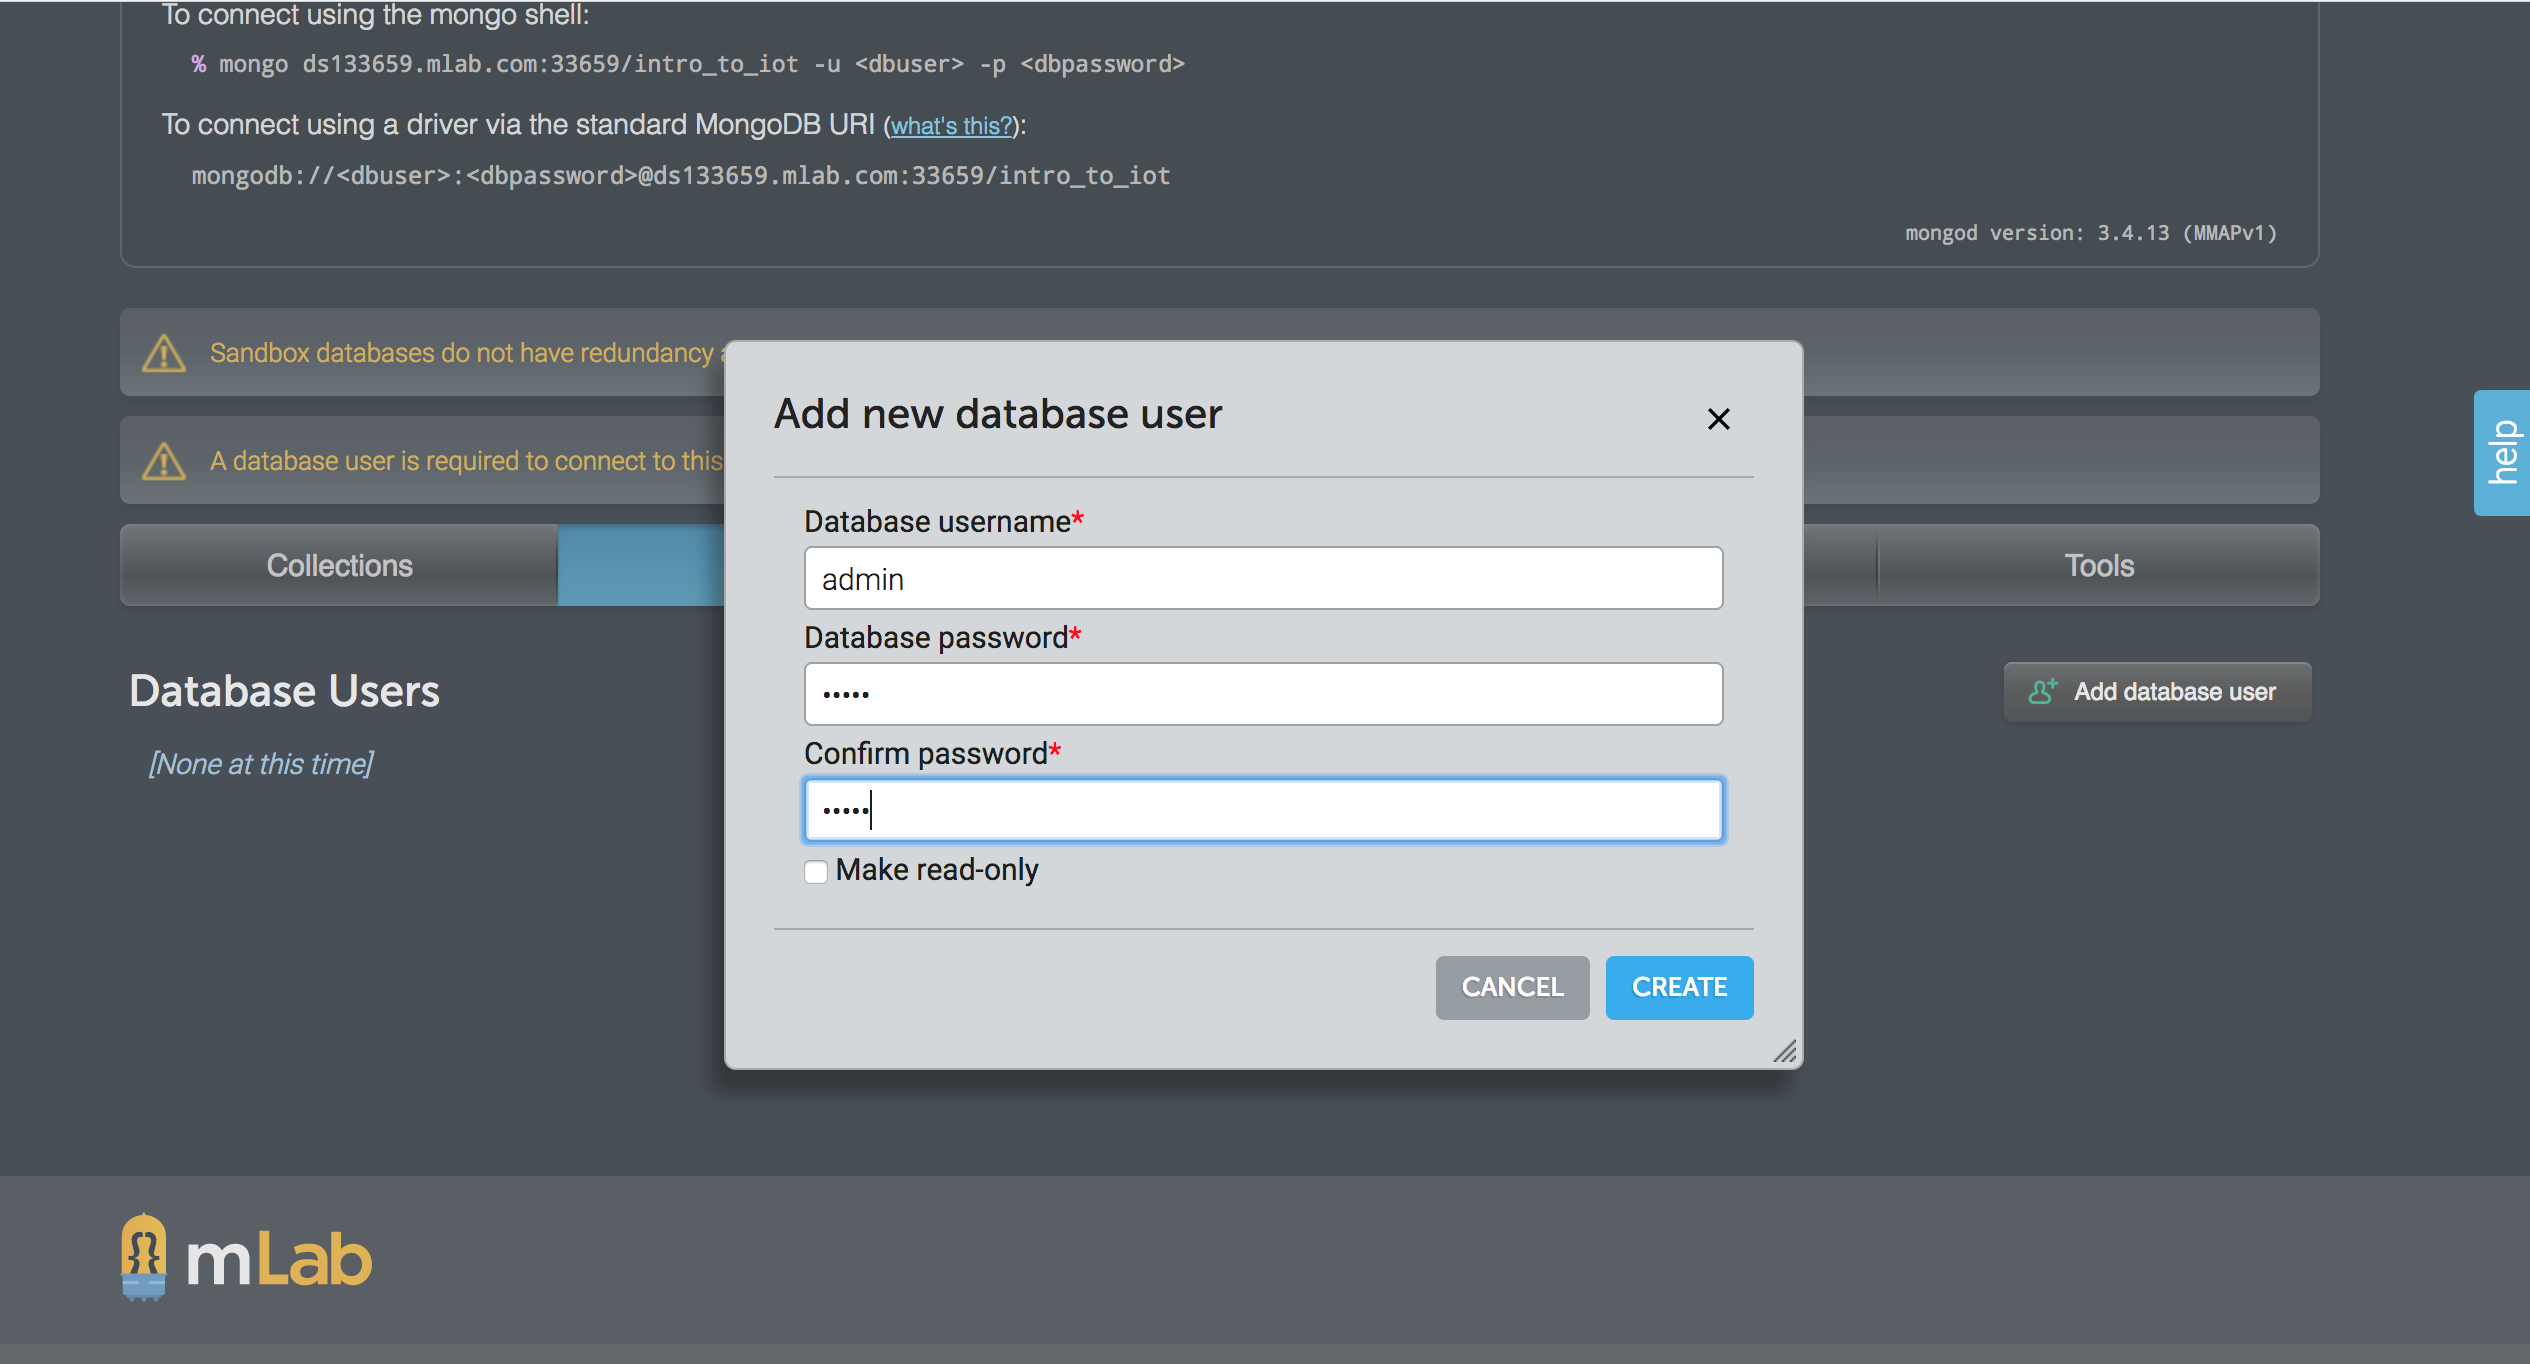
Click on Add database user, near the right side of the screen, and choose a username and password. It doesn't really matter what you choose, because it is just for authenticating when you interact with the database. For example, if you had multiple people working on this project, but you wanted Sally to have write privileges and Susan to only have read access, you would create separate users for them. Since you are the admin, and all the permissions are belong to you, you can just put 'admin' for both username and password. Feel free to put something more secure if you want.
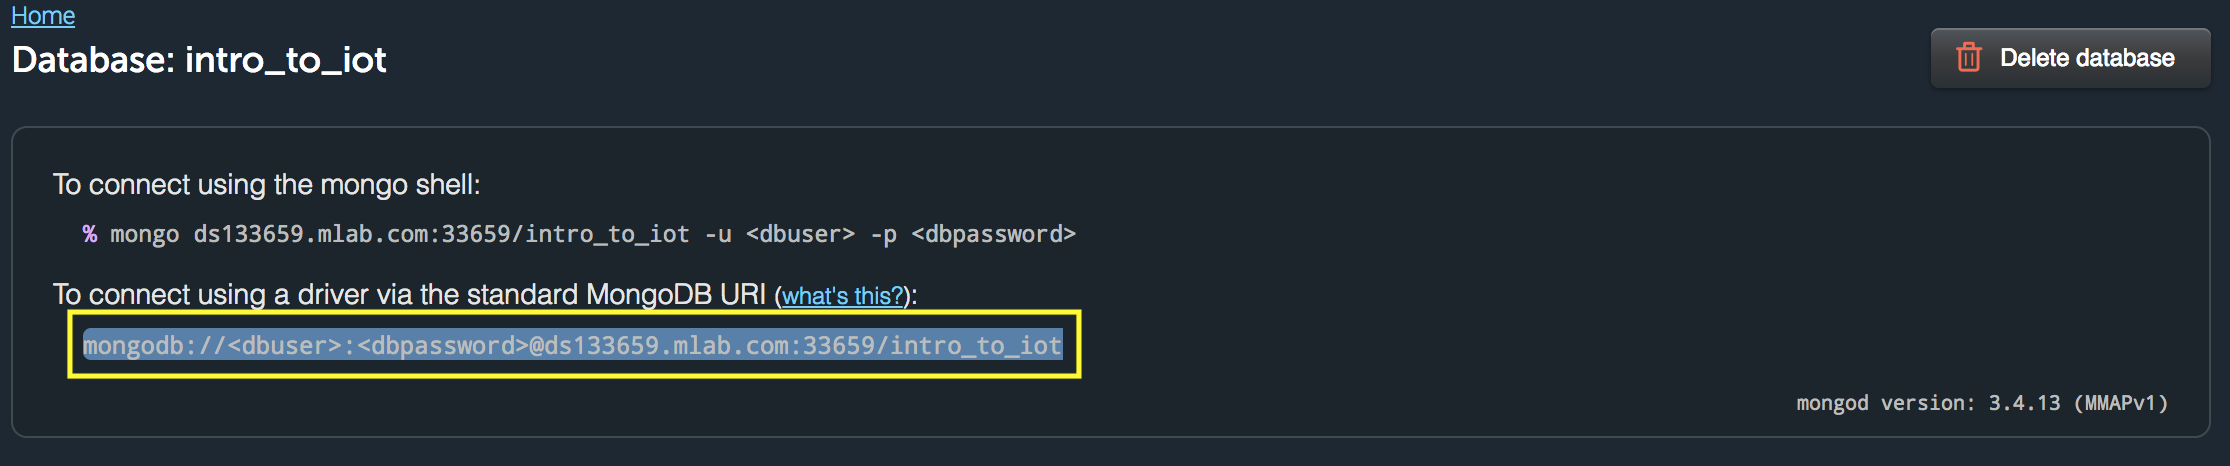
And voila, your database is ready to use! Note the box shown below, which will be slightly different on your account. The URL in the yellow box is how you will connect to your database in your project, no matter what language you are using. Make sure that when you put it into your project (project tutorials will walk you through how to do that), you replace the <dbuser> and <dbpassword> with the user information you just created.
For example, in our case, we would connect with the url: mongodb://admin:admin@ds133659.mlab.com:33659/intro_to_iot
And that's the M in MEN Stack - a MongoDB database, either local or on the cloud. The rest of this tutorial addresses E and N, which work together to provide the backend framework.
Node.js is a tool that allows us to use JavaScript (traditionally a frontend language) for backend web development. Its buddy npm is a package manager that simplifies installation of libraries that make development easier. Here we will install both.
Depending on your operating system (OS), installing Node.js varies. We have included instructions for a Raspberry Pi, but some good people as teamtreehouse.com have created great tutorials for Mac, Windows, and all Linux distributions. Come back here after following the appropriate tutorial, or open the Raspberry Pi instructions below.
In these tutorials, follow the instructions to install both Node.js and npm. They are partner tools, and both are essential.
Note for Linux: If the commands brew, node, npm, etc don't work, chances are the installation folder needs to be added to your user path. To do this you can add this to your ~/.profile
export PATH="/home/linuxbrew/.linuxbrew/bin:$PATH"
export MANPATH="/home/linuxbrew/.linuxbrew/share/man:$MANPATH"
export INFOPATH="/home/linuxbrew/.linuxbrew/share/info:$INFOPATH"Conveniently enough, on the Raspberry Pi, Node.js (or just Node), comes preinstalled! To check if Node is installed and what the current version is:
$ node -vCurrently, node v4.8.2 is installed. Although, this can be used, we will upgrade to the latest version of node.
Navigate to the Node.js download page.
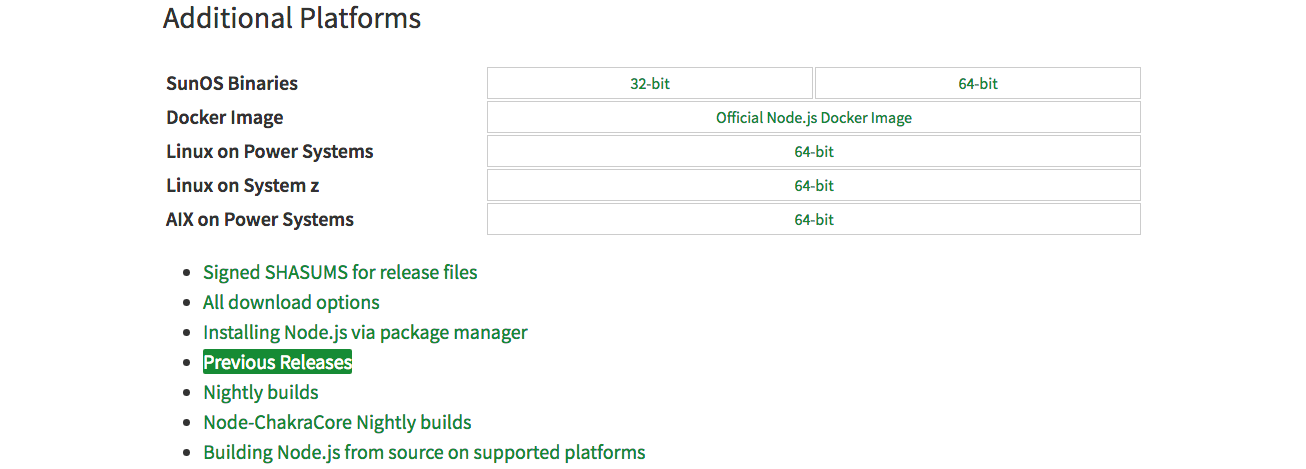
Scroll down towards the bottom to Additional Platforms. We want to be able to explicitly choose which version of Node.js we install, so we want to be able to choose between all the distribution versions. Click on: Previous Releases.
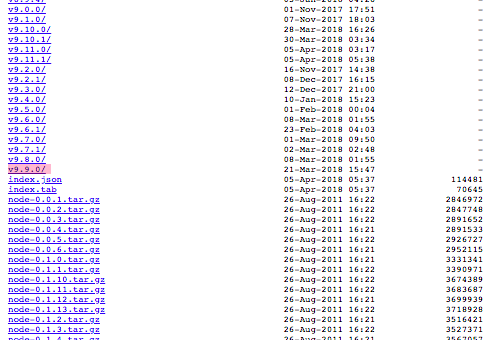
This page has several versions of Node (they are below where I cut-off the screenshot). We can choose from this list, but we will not. Instead, click on all versions.
You will be redirected to another page that lists all the various distributions of Node.
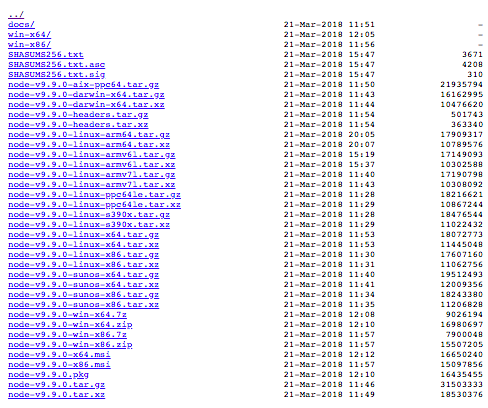
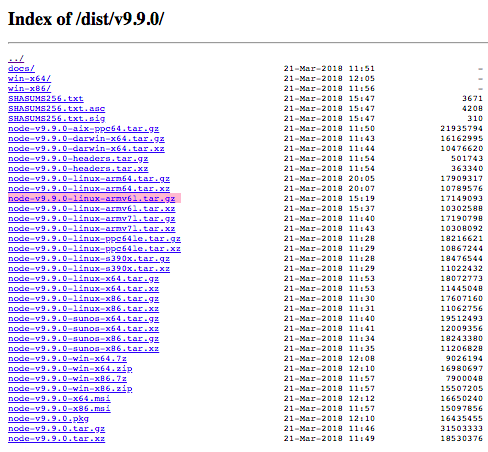
Scroll down a towards the later versions. We will download the latest stable version of Node. At the time of this writing this version is: v9.9.0. Click on the directory link.
You will be taken to the selected Node version page with the binaries for several different system architectures.
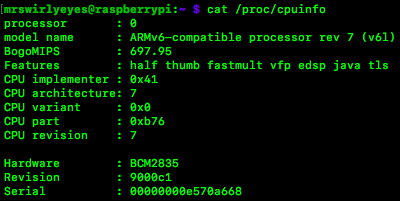
We need to determine the appropriate version for our Raspberry Pi. To do this, execute the following command on the Raspberry Pi:
$ cat /proc/cpuinfoDepending on which Raspberry pi you are using (i.e. Raspberry Pi model 1, 2, 3, or Zero) the system architecture may be different.
In ARMv6l, that is not a 1 (one) it is a lowercase ('L').
The system architecture that the Raspberry Pi has is listed on the model name line. Here it is: ARMv6l.
Back to our Node distribution list, scan the list for the appropriate version for your system architecture. Furthermore, we want the .gz extension.
The .gz is the compression format, and we will use this one on the Pi.
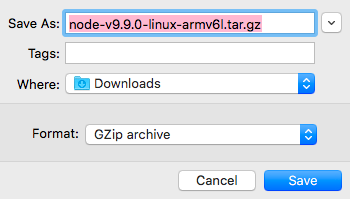
Click on the appropriate version for your system architecture. It will prompt you to download the selected version. But this download is on your computer. There are methods to transfer from ones computer to another device - however, we will use a command to do this directly on the Raspberry Pi!
Copy the name of the file that it prompted you to download, here it is: node-v9.9.0-linux-armv6l.tar.gz.
Cancel the download prompt. Go to the top of the browser address bar and concatenate the current url with your link we copied above by pasting the link after the url.
Now copy this concatenated url.
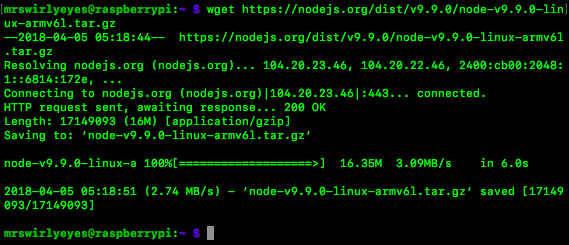
Back on the Pi. Type in the following command to download the compressed Node distribution directly onto your Pi:
$ wget https://nodejs.org/dist/v9.9.0/node-v9.9.0-linux-armv6l.tar.gz
To verify the download. The ls command will list all the contents in the current directory:
$ lsAfter we download the compressed file, we want to uncompress it:
$ tar -xzf node-v9.9.0-linux-arm61.tar.gz
To verify the uncompression, we use the ls command again:
The RED text is a compressed object and the BLUE object is a directory.
We now (literally) have our new version of Node on our computer. To install Node, we need to copy (or move) the contents of the directory we just uncompressed to /usr/local:
$ sudo cp -r node-v9.9.0-linux-arm61/* /usr/local
Technically Node is installed now, however to use it, we need to add the contents copied into /usr/local to our environment by adding this directory to the $PATH variable.
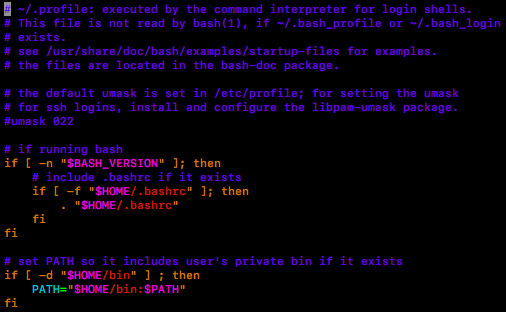
To do this, we will modify the .profile file. To do this, we open it using the following command:
$ vim ~/.profileThe current contents of this file should be similar to the following:
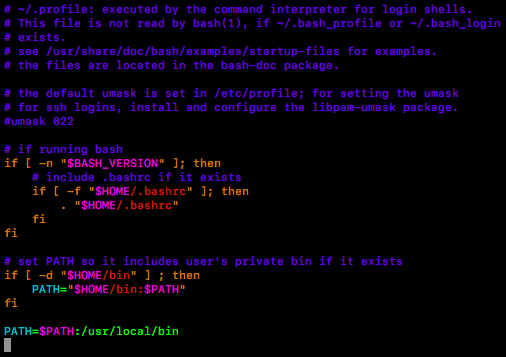
To modify the path variable we need to add the following line of code to the bottom of the .profile file we have open:
PATH=$PATH:/usr/local/bin
By doing this, we are enable the use of node and npm! Let us verify if we were successful. Confirm the current version of Node and the Node Package Manager (npm).
Check the current version of node:
$ node -vThis is the version we expected! Thus the installation/upgrade was successful!
Check the current version of npm:
$ npm -v
This confirms that npm was installed!
Technically, we are done installing node. However, we still have our compressed object and the directory in our home directory. Let us delete thoses they are no longer needed and clean up.
To delete the node directory:
$ rm -r ~/node-v9.9.0-linux-arm61/To delete the compressed object:
$ rm ~/node-v9.9.0-linux-arm61.tar.gz
We have completed the installation (or upgrade) of node and npm for Raspberry Pi!
There are many ways to install Node.js on Mac OS. We will be utilizing Homebrew.
If you already have Homebrew installed, proceed to the next step. If you have not installed Homebrew, follow the instructions to install Homebrew:
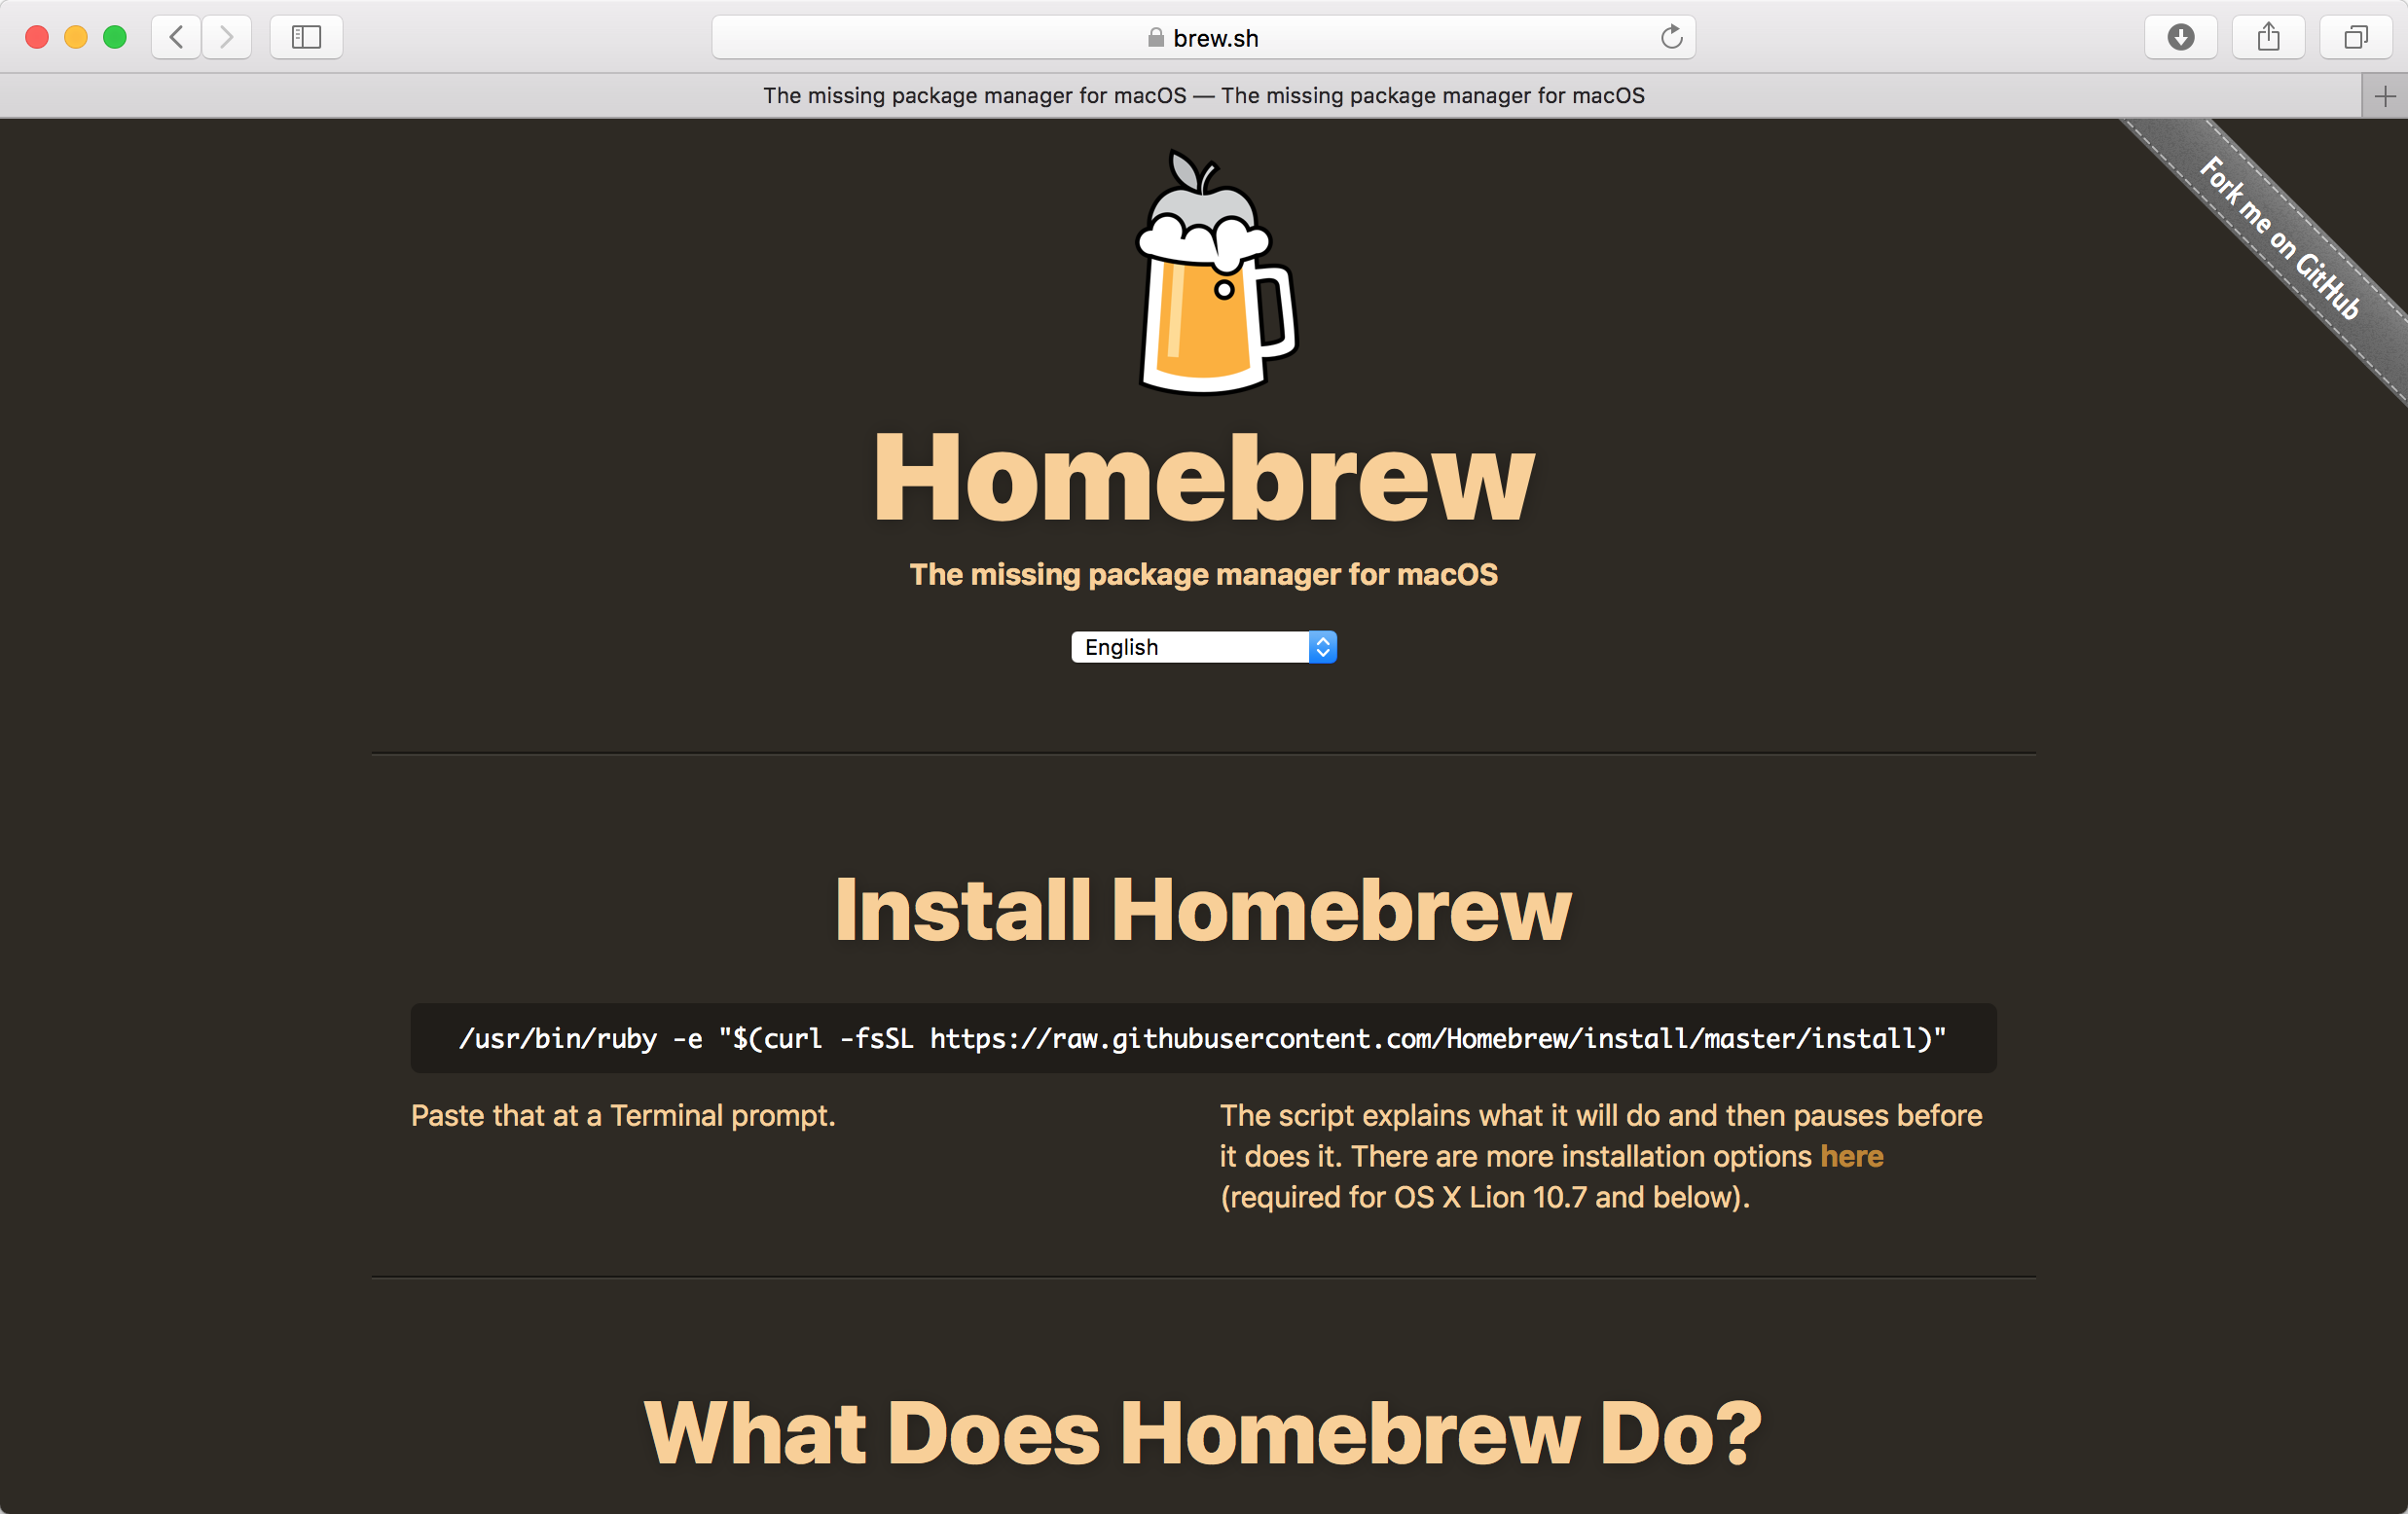
If you are interested in checking out Homebrew in more detail, you can visit their web site at: https://brew.sh
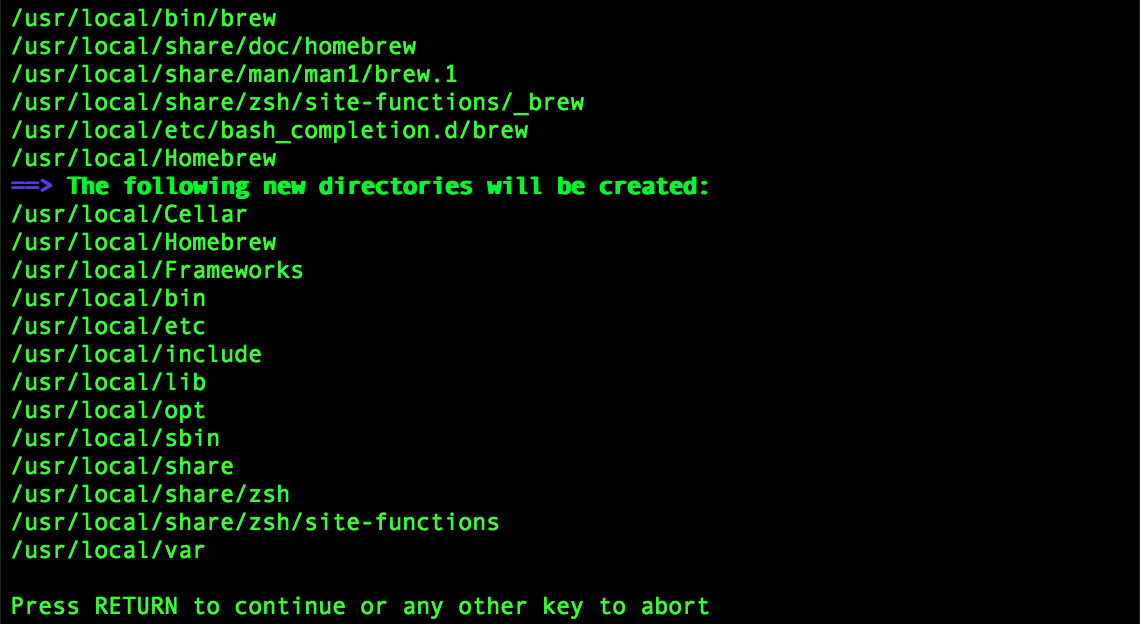
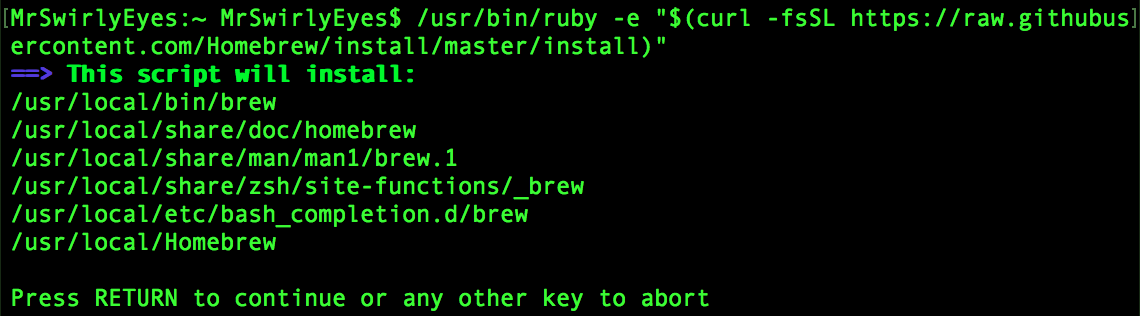
As shown on the landing page of the Homebrew webpage, to install Homebrew, paste the following line into terminal:
$ /usr/bin/ruby -e "$(curl -fsSL https://raw.githubusercontent.com/Homebrew/install/master/install)"Follow the onscreen instructions to complete the installation:
Press ENTER to continue.
Type in the password to your computer. Then press ENTER to continue.
When typing in the password, there will be no visible feedback.
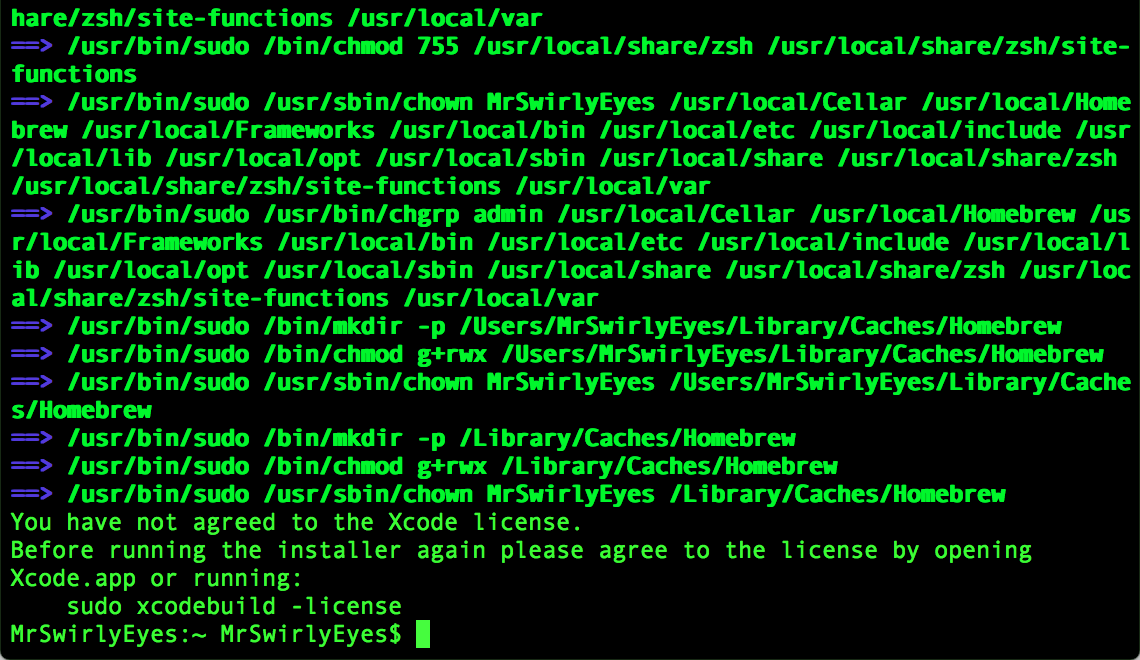
After the installation should complete.
The installation may fail, and you may receive the following message:
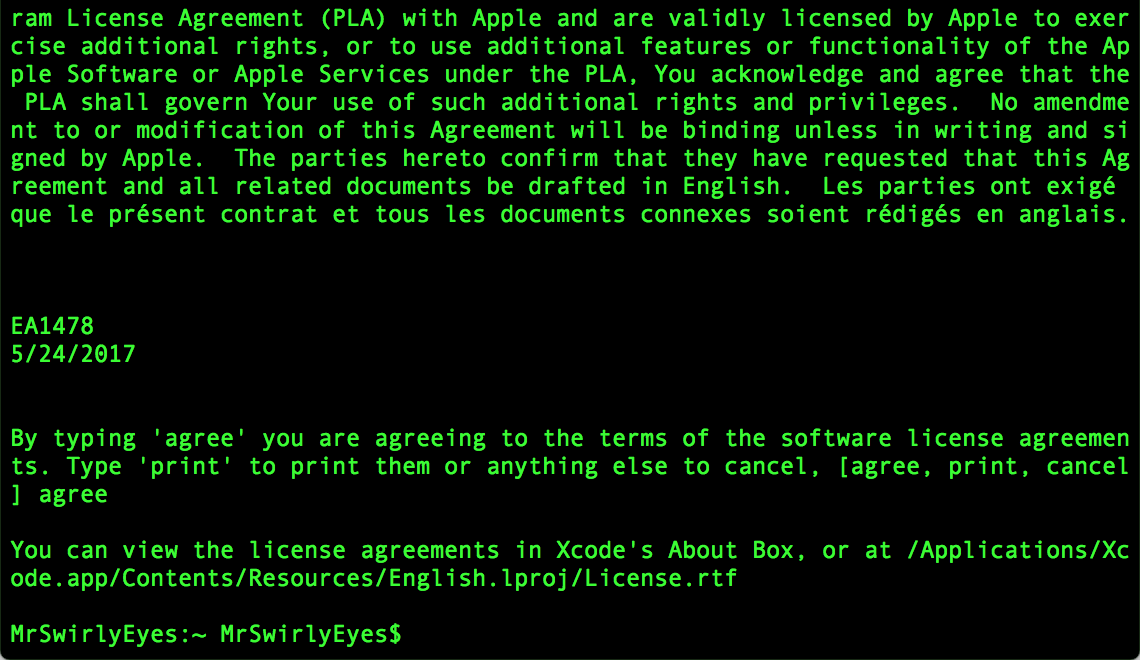
If this message appears, before you install Homebrew, you need to agree to the Apple Xcode license.
If this message does not appear for you, you may proceed to the next step. If you have not accepted the Apple Xcode license, please follow the instructions to agree to the Apple Xcode license:
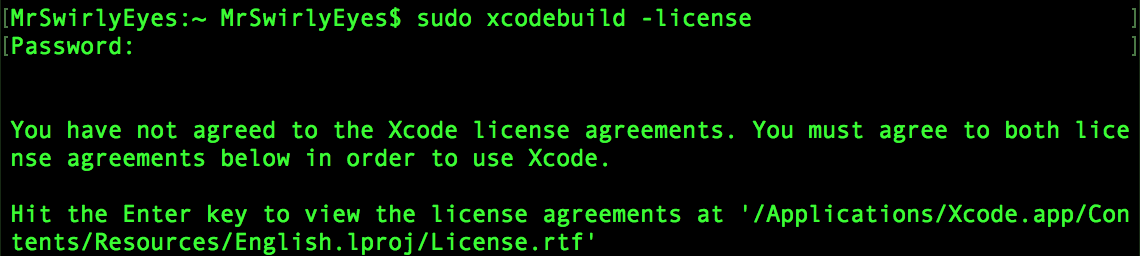
To accept the Xcode license, type the following into the Terminal:
$ sudo xcodebuild -licenseFollow the onscreen instructions to complete the installation.
Type in the password for your computer. Press ENTER to continue.
When typing in the password, there will be no visible feedback.
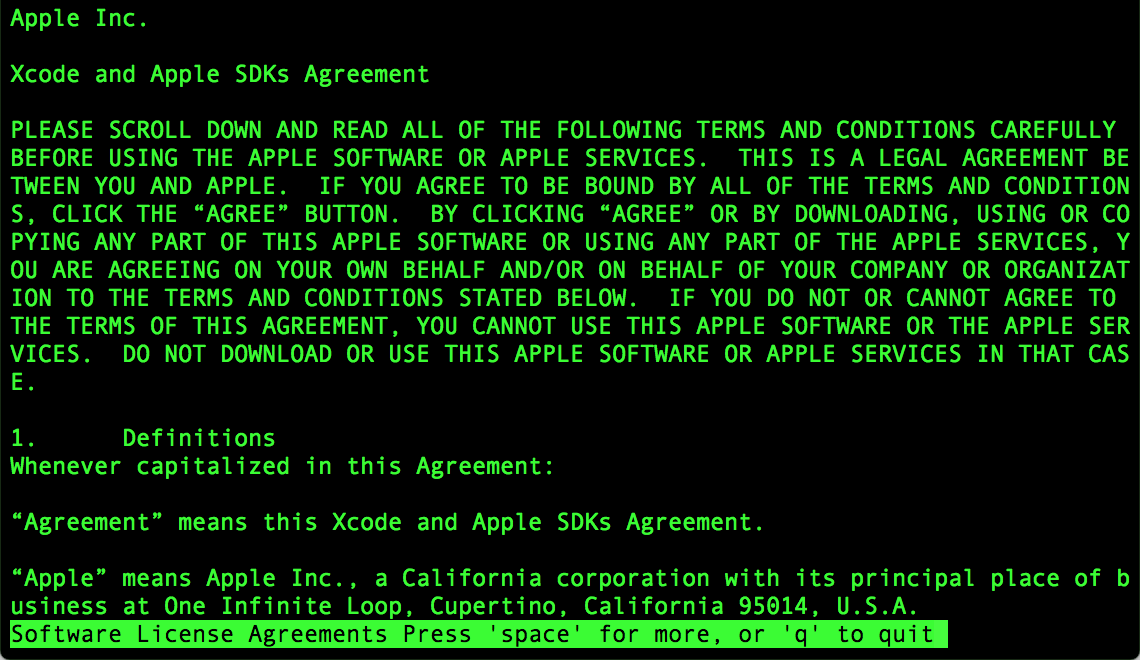
To view to license agreement and to continue, press ENTER.
Feel free to review the license agreement. Press space to scroll down the license agreement document.
To continue, press q to quit viewing the license agreement and continue to the agreement process.
To agree to the terms of the Xcode software license agreement type agree. Then, press ENTER to accept the XCode license agreement and finish the process.
Thus concludes the Xcode license agreement.
To complete the installation of Homebrew, we simply need to follow the same procedure to install Homebrew as we did earlier.
To install Homebrew, paste the following line into terminal:
$ /usr/bin/ruby -e "$(curl -fsSL https://raw.githubusercontent.com/Homebrew/install/master/install)"Follow the onscreen instructions to complete the installation:
Press ENTER to continue.
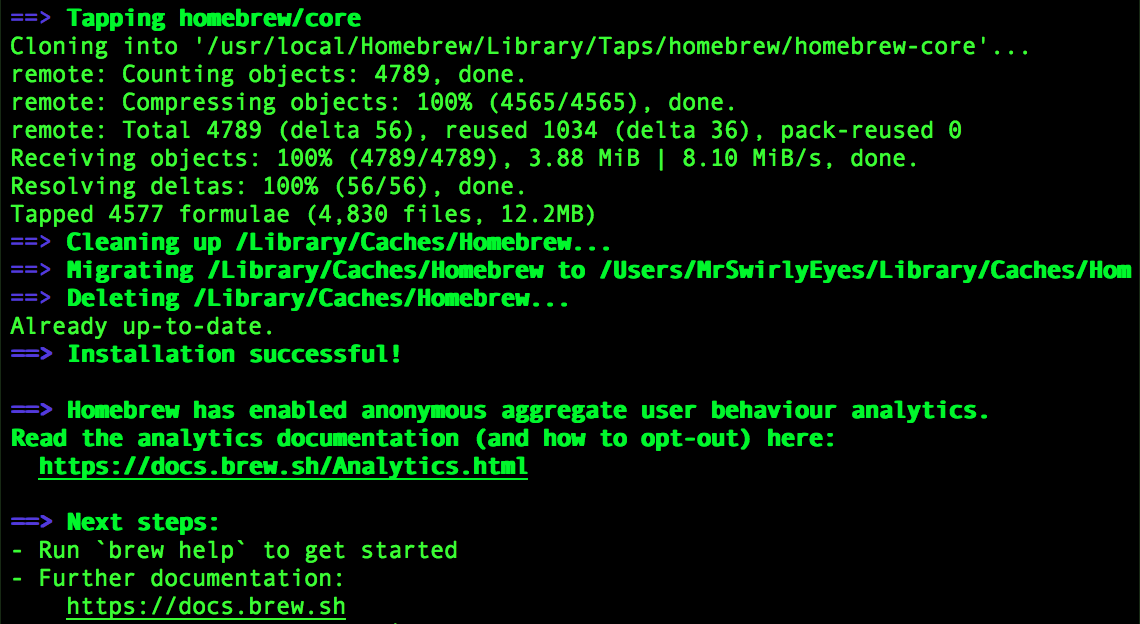
After several minutes, the installation should finish successfully.
At this point, we should have Homebrew installed.
To verify that we have Homebrew install, type the following into the Terminal:
$ brew -vIf you get something similar to the image above, then Homebrew is installed and should be properly working.
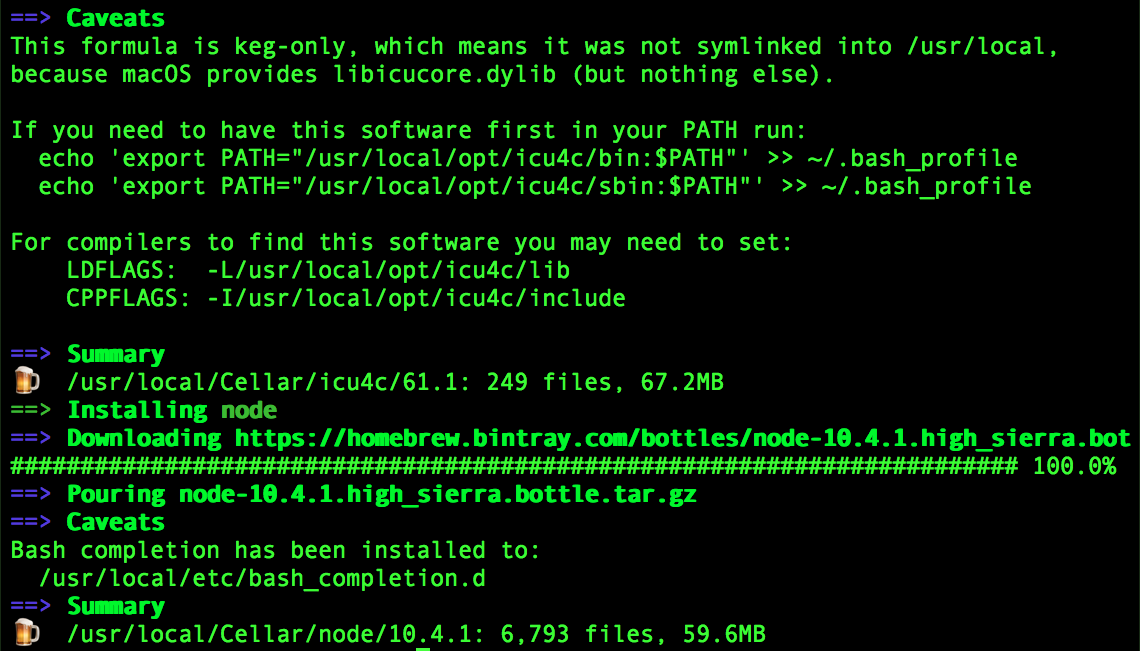
Installing Node using Homebrew is extremely easy! To install Node using Homebrew, simply type in the following command:
$ brew install nodeAfter several minutes, Node should be installed.
Let us verify if we were successful. Confirm the current version of Node and the Node Package Manager (npm).
Check the current version of node:
$ node -vIf you get a similar message, then the installation/upgrade was successful.
The Node Package Manager (npm) also comes pre-installed with node. Let us check the current version of npm:
$ npm -v
This confirms that npm was installed.
At this point node (and npm) are installed successfully!
Even though we just performed our fresh install and update, it is always good to check for updates. TeamTreehouse addresses updating Node. However, we can check for an update for npm. Conveniently, you can update npm using npm!
This will work on Linux (including Raspberry Pi), and Mac. Unfortunately, on Windows you really do have to reinstall Node and NPM entirely to update.
To check if there are any updates for npm, and then update npm, execute the following command:
$ sudo npm i -g npm
Let us verify the new version of npm:
$ npm -v
It is up to you whether you want to update node often, with new versions comes new features - however, some things break or become depracated. As for npm, every once and awhile you should see if there are any updates and update to the latest version.
Now we have 2 of the 3 components of our MEN stack installed and set up: Mongo and Node.js. When installing node, we automatically installed Node's package manager npm. Now, we will install the final component - Express!
Installing Express is extremely easy! When we installed node, we also installed npm. npm is the Node Package Manager. Express runs on top of node. Thus, as long as we have npm, installing Express when, and where, needed is simple!
When we say when, and where, this is because we will not install Express globally. We will install express locally. So, for each project (or web server - yes you can have multiple web servers, it is not uncommon) you will reinstall Express, Mongoose (how we will use MongoDB in node), and perhaps several other packages! npm has hundreds of packages that you can add to your projects.
As mentioned, installing express will be a local operation.
Normally we will install Express in our web server directory. Since this tutorial is just for the purpose of demonstrating the appropriate installation and configuration, we will make a dummy folder. Lets create that folder and call it men_stack_webserver:
$ cd ~  # on a Windows computer, this may be cd %userprofile%
$ mkdir men_stack_webserver
This makes a directory in the home directory of your system.
Let us enter, or change directories (cd), into the directory we just created:
$ cd men_stack_webserverNotice how now our command prompt is preceded by the current directory we are in. Before it showed a tilde (~), which is equivalent to the /home directory.
We can also list (ls), the contents of this directory - which should return nothing, since it is empty.
When making a node web app, it is common practice to follow the next few steps so that your web app, or MEN stack webserver, is portable across multiple platforms and is easy to setup and configure if you do choose to move it to a new platform or distribute/copy it across multiple platforms.
We will create a special file called package.json that will store information about our web server - including what is installed, its dependencies, etc.
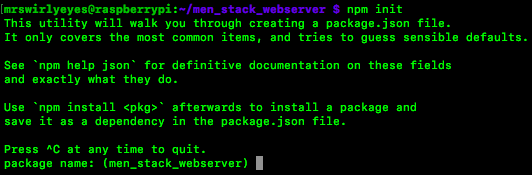
Inside our web server directory, we create this package.json by executing the following command:
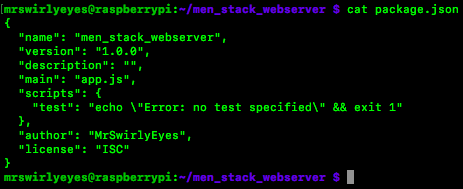
$ npm init
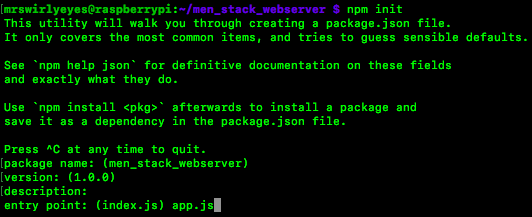
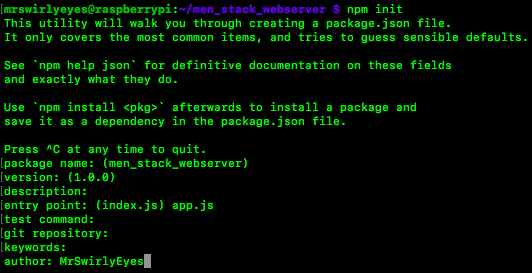
Upon executing npm init, you will be prompted with several questions. To take the default suggested response to the prompt (written inside the parentheses), simply press the enter key. To put your own response, simply enter your desired response, then press the enter key. We walk you through the prompts that we did not take the default response:
For entry point, instead of index.js, we called it app.js
Although we could have left author blank, we put our alias MrSwirlyEyes.
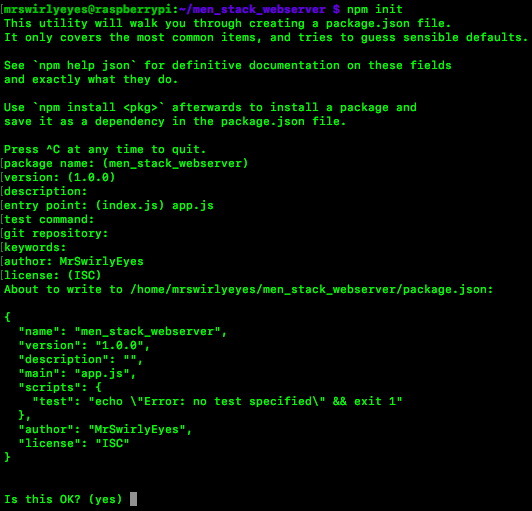
For the remaining, and in between, responses we take the default. At the end of the prompts, it will show us what our package.json will be populated with, and prompts us to confirm we entered the appropriate information correctly - to which, we respond with yes by pressing the enter key.
If you list the contents of your directory, you will observe our newly created package.json:
We can also verify the contents of package.json by using the cat command:
Now when we install packages - including Express - we will use npm, which is convenient, and we will save our npm installation of our package to our package.json. The package.json will store the version number used as well as other useful information.
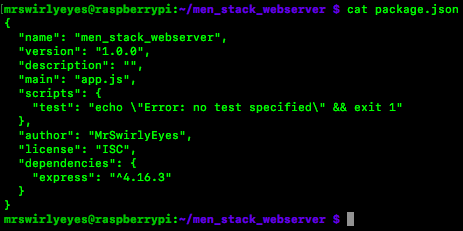
Finally, let us install Express! Execute the following command that installs express and saves it into our package.json:
$ npm install --save expressWe get the warnings because we gave no description or git repository when we went through the npm init - we can ignore this.
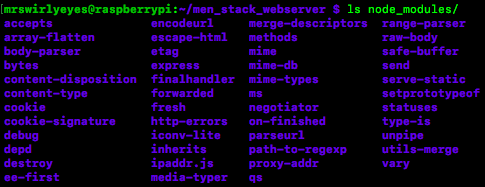
Our men_stack_webserver directory will be populated with all the necessary content for our web server to use Express. Let us see how our directory has changed.
package.json and package-lock.json work together to provide a consistent environment, so that multiple people can work on the same project without the risk of discrepancies between their tools. What you see cat'd telles us meta information about the project, and - in the dependencies section - a list of every tool we install. Right now, we just have Express, at version 4.
The node_modules directory is where all of the source code for 3rd party tools lives. So, anything that helps our app run on the backend (there's a different place that you'd put it, for 3rd party frontend tools) that isn't our own code works out of this directory. Naturally, then, it is altered whenever we install something, and you can see that Express has a folder because we just ran npm install on it.
At this point we have successfully installed Express and we have our 3rd component of our MEN stack installed and set up!
We could finish the tutorial here, with your machine configured for developing a web app using a MEN Stack, and indeed, we do direct you to project that jumps off of this tutorial. However, we also have an optional module showing very basic usage of these tools in an app, so you can see how they work together.
You will be writing some code in this section. We like and recommend Sublime, which we linked to in the Required Downloads and Installations. If you choose to use this editor, go install it before beginning this module.
In this module, we use the three components we set up in the previous modules all in one fundamental web app. This is mostly to test that everything we installed is working. We did not do any explicit tests for MongoDB, Node, nor Express in the previous modules. We will do those tests here.
This web app can be a starting point for your future web server - however, we will not go into excruciating detail, this is left for the Projects that you can find in the Related Projects section at the end of this page.
We will now build our fundamental web app. We will test each of the components we installed one at a time, building upon each other until we have all three components working together.
We will first start by testing node. When we created our package.json after we used npm init, we told our environment that our entry point would be a file called app.js. Let us make this entry point file:
$ touch app.js
This creates the app.js file with no contents. You may verify the file was created using ls.
Open app.js with
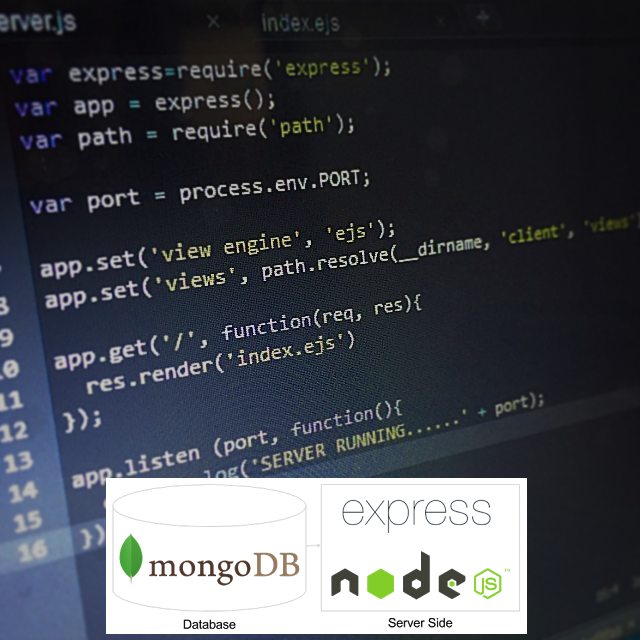
$ sublime app.js 1 var express = require('express'),
2 app = express();
3
4 // Set port using environment variable PORT, otherwise 3000
5 app.set('port', (process.env.PORT || 3000));
6
7 // Set up engine to look for '.ejs' files.
8 app.set('view engine', 'ejs');
9
10 // Home route
11 app.get('/', function(req, res) {
12 res.send('Hello!');
13 });
14
15 // Start up server
16 app.listen(app.get('port'), function() {
17 console.log('App running on ', app.get('port'));
18 });require allows us to use objects exported from another file, so in these lines we get an express object from the library we installed, and then call that object to create an app. When we use functions of this variable, we are configuring the app according to the express framework.app.set() creates a variable within the app, that we can access later using app.get(). We tell it to set the 'port' variable to either process.env.PORT OR 3000, to accomodate different environments. On our local host, there is no process environment called port, so we can specify whatever port we want, and we choose 3000. However, when we publish our app on a hosting service, you will likely not have that control (this actually depends on what kind of hosting you get, but it is true for many hobbyist apps). Instead, the hosting server will assign a port for your app - and different ports for other apps - which is available to you as an environment variable. To allow this, line 5 sets port to the one provided by the environment, and only uses the hard-coded 3000 if the environment doesn't provide one.Let's run the app and see what it gives us. Go back to the terminal and execute
$ node app.jsGreat! We are running an Express app on Node!
Now we can spruce up the app by rendering an EJS page (instead of just replying with text) and using Mongo. Run this command to install EJS and mongoose. We also have you install body-parser in this line, which we will use and explain in the next section.
$ npm install --save ejs mongoose body-parser$ mkdir views
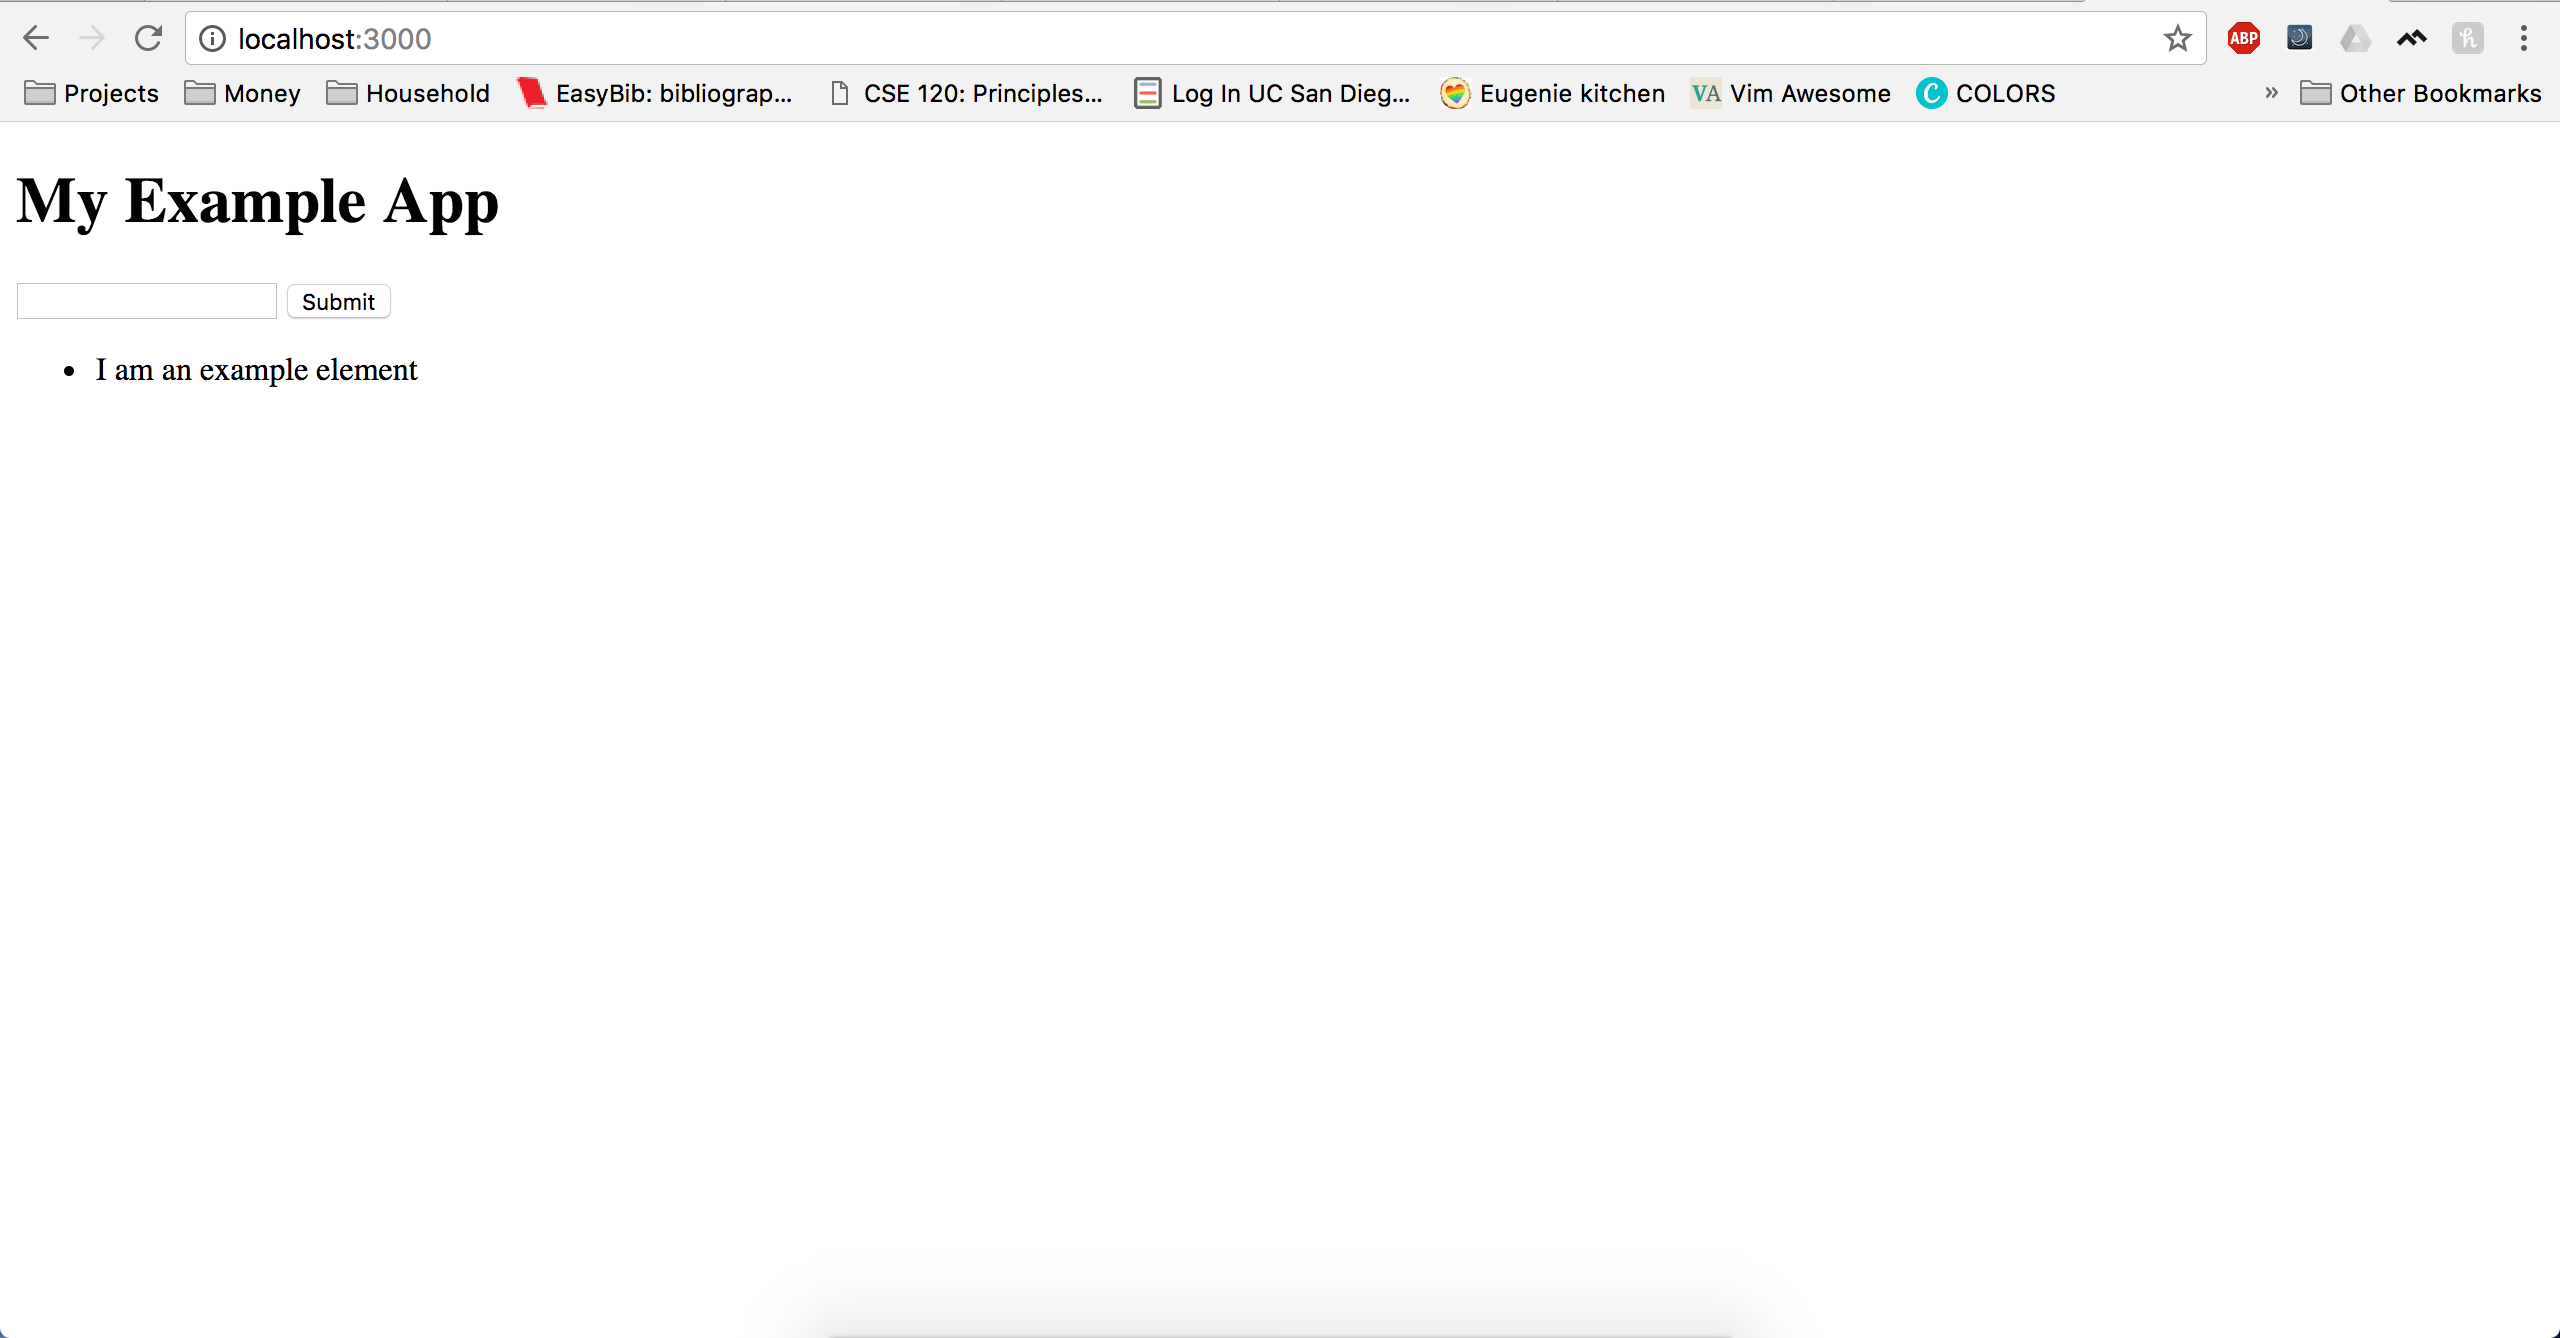
$ sublime views/home.ejs<!DOCTYPE html>
<html>
<head>
<title>MEN Example</title>
</head>
<body>
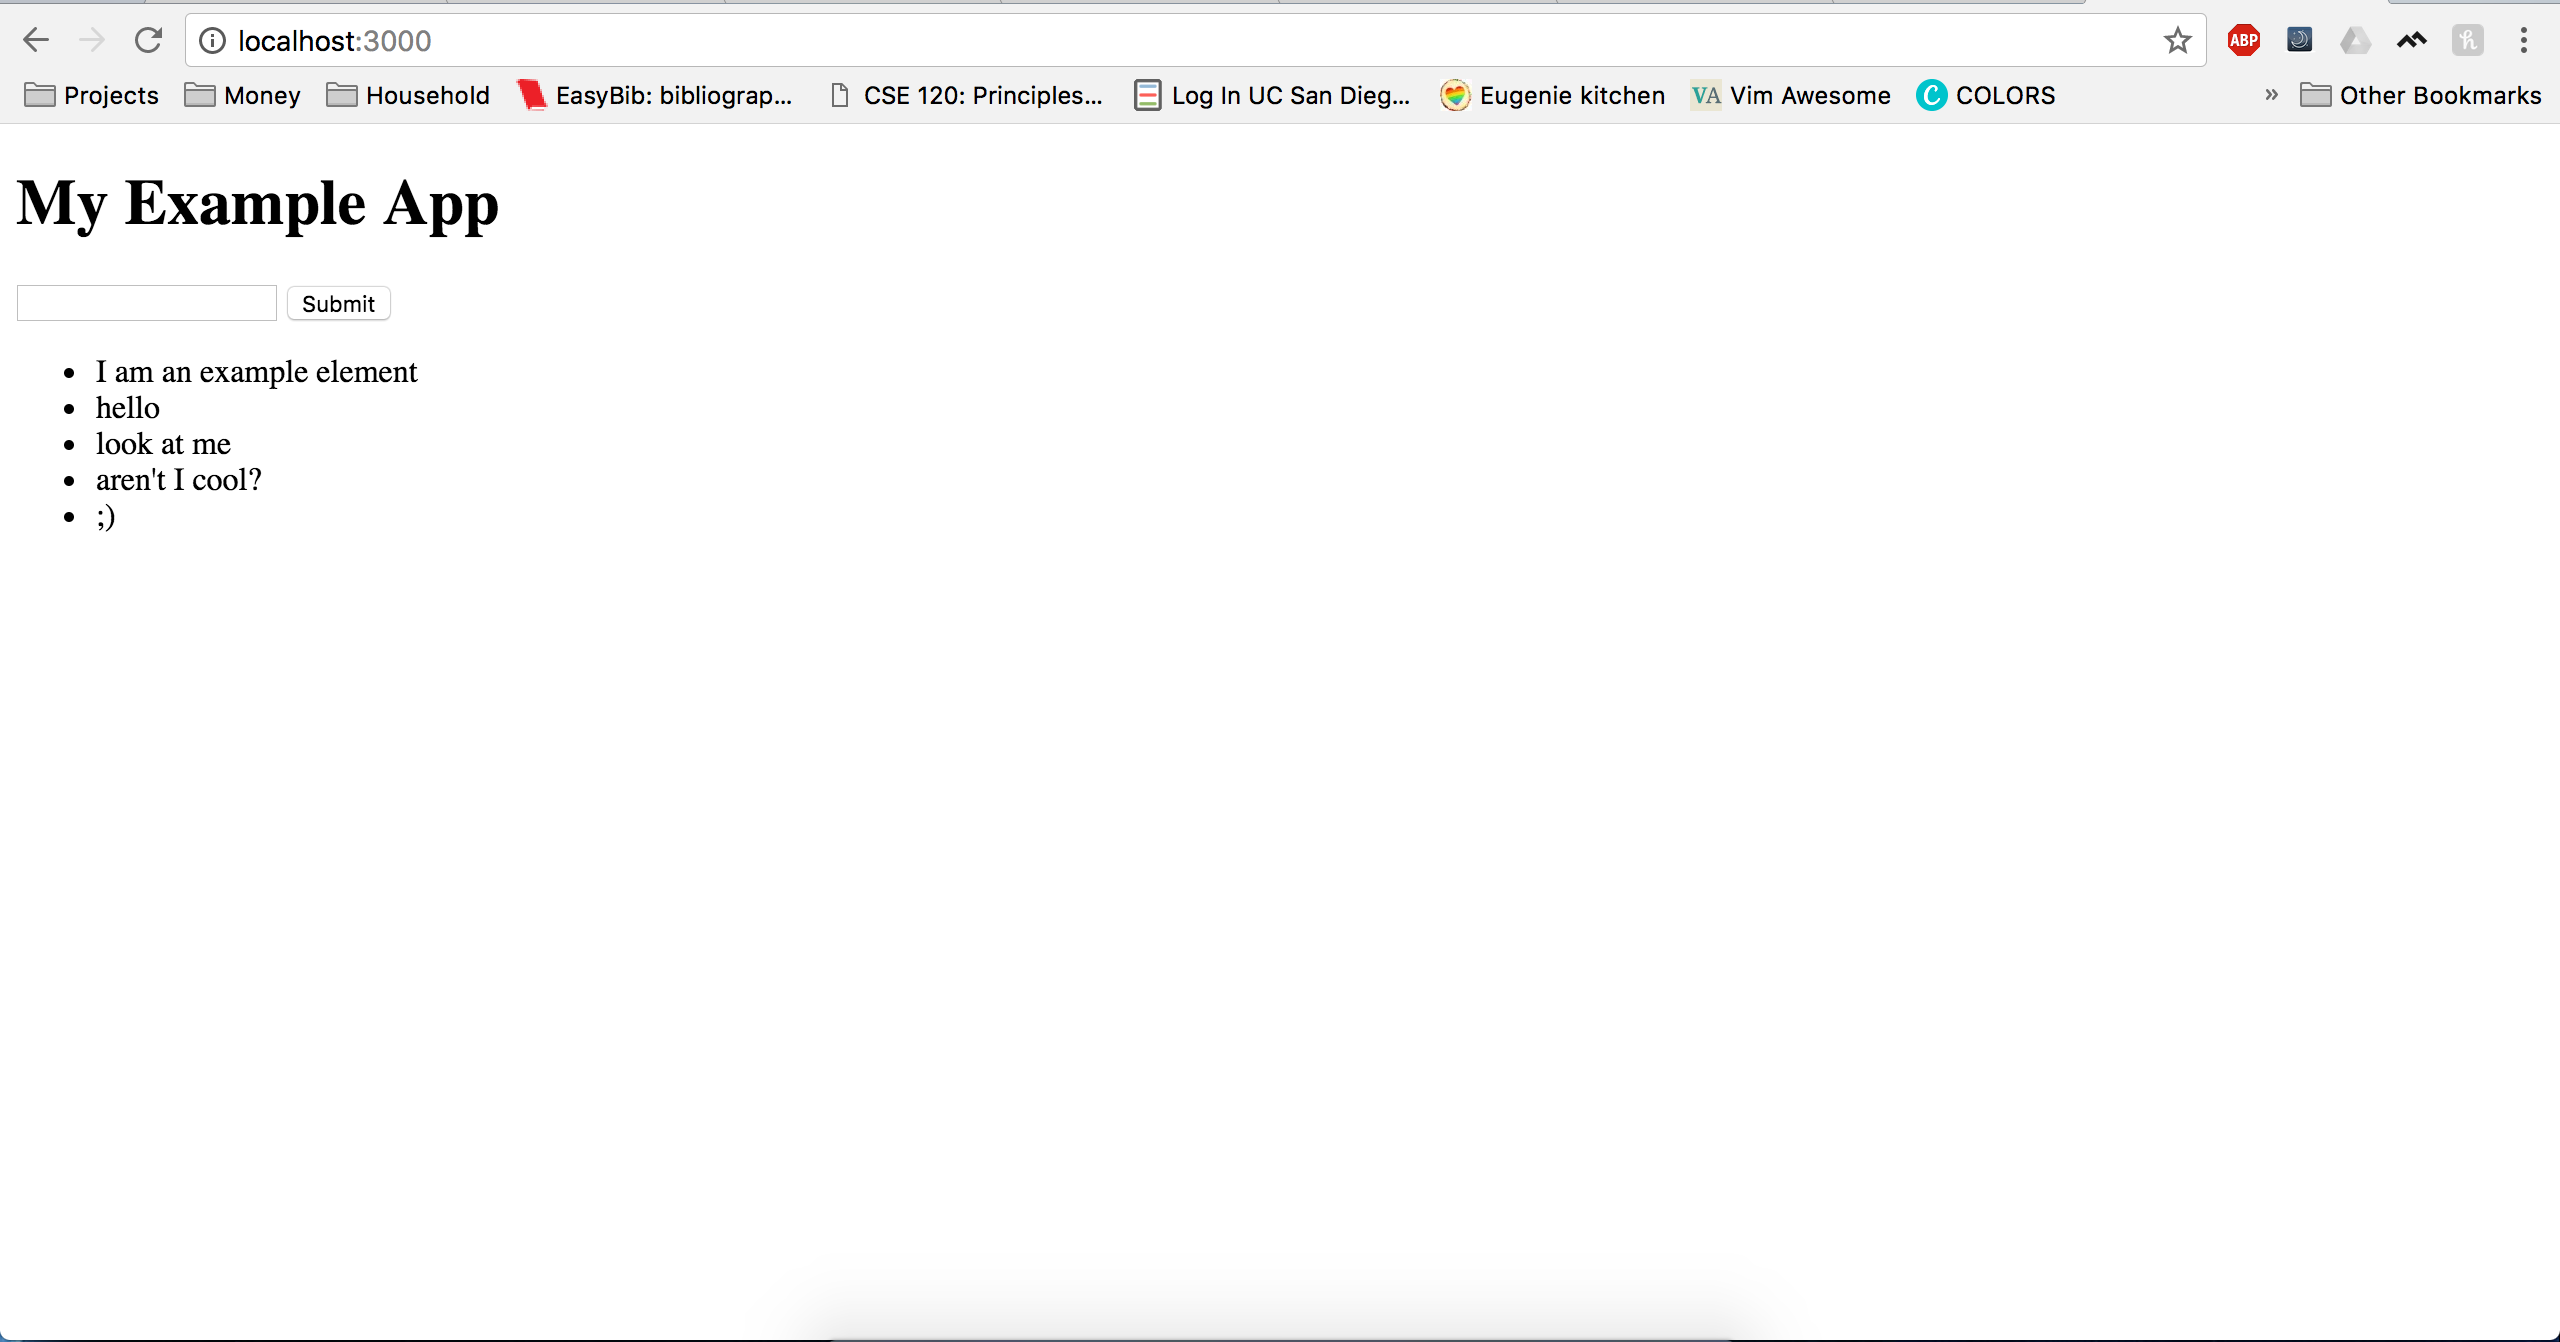
<h1>My Example App</h1>
<form action='/add-entry' method='post'>
<input type='text' name='value'>
<input type='submit' value='Submit'>
</form>
<ul>
<li>I am an example element</li>
</ul>
</body>
</html>res.render('home');node app.js again) and reload the page. You should see this, proving that EJS is working!
Finally, we want to try using our DB, which is going to take a bit of work in app.js. Update app.js to match the code below - we will briefly explain how it works, but our IoT Project explains it in more detail, so we will be brief here. In the list below the code, we point out which sections have been added.
 1 var 	express		= require('express'),
2 	mongoose	= require('mongoose'),
3 	bodyParser	= require('body-parser'),
4 	app		= express();
5
6 /********	APP SETUP	********/
7 // Set port using environment variable PORT, otherwise 3000
8 app.set('port', (process.env.PORT || 3000));
9
10 // Set up engine to look for '.ejs' files.
11 app.set('view engine', 'ejs');
12
13 // Set up app to use body-parser
14 app.use(bodyParser.urlencoded({ extended:true }));
15
16
17 /********	DB SETUP	********/
18 // Set up mongoose
19 mongoose.connect('mongodb://localhost/men_stack_example');
20 mongoose.promise = Promise;
21
22 // define model
23 var entrySchema = new mongoose.Schema({
24 	value: {
25 		type: String
26 	}
27 });
28 var Entries = mongoose.model('Entries', entrySchema);
29
30
31 /********	ROUTES	********/
32 // Home route
33 app.get('/', function(req, res) {
34 	Entries.find()
35 	.then( function(entries) {
36 		res.render('home', {entries: entries});
37 	})
38 	.catch( function(err) {
39 		res.send(err);
40 	});
41 });
42
43 app.post('/add-entry', function(req, res) {
44 	var entry = {
45 		value: req.body.value
46 	};
47
48 	Entries.create(entry)
49 	.then( function(entry) {
50 		res.redirect('/')
51 	})
52 	.catch( function(err) {
53 		res.send(err);
54 	});
55 })
56
57
58 // Start up server
59 app.listen(app.get('port'), function() {
60 	console.log('App running on ', app.get('port'));
61 });name='value'. When the form is submitted, that information becomes available to the server via req.body.[name_here], which we will see an example of later in the file. Body Parser is the tool that permits the server to understand the content of req.bodyThe home route already existed, but we edited it to read all of the entries currently stored in the database. This works by using the model Entries to indicate where in the database we want to look (the Entries collection), and executing a find() on it, which will return a cursor holding all of the documents stored.
This is where promise syntax comes it. Mongoose functions are asynchronous, which means that once the function starts running, your code can continue before the function finishes - this is often great, because it makes the app faster, but it is problematic when we need the subsequent code to use information returned by the DB call. Promises allow us to implement callbacks, which will wait for the function to return before executing. That is why the function is called then - it waits for the find() to finish, and then executes the callback function.
In the callback of then, we render the homepage as before, except now we shove the data returned by find() into the frontend so we can display it. The rest of the lines in this section are for error management - if the database function fails, we will catch the err and send it to the frontend so we can see what went wrong.
This is a new route. Remember that in home.ejs, we configured the form with action='add-entry' method='post'. This means that when the form is submitted, it will go to the route '/add-entry' as a post request. We won't talk about request types here - you can look it up or learn about it in the IoT Project.
Inside this route, we make a variable called entry that uses Body Parser to fetch the string that we entered into the form and format it the same way we defined in our schema up in the database section. We then take that variable and create() a document for it by sending it into the Entries model. Again, we see promise syntax so that we don't go back to the homepage until the entry has been successfully stored in the database. That way, when the home route fetches all of the documents and makes them accessible to the frontend, we know that our new entry is there. Otherwise - if we were to redirect immediately, without waiting for create() to return - the homepage may reload, but not show the new data!
Phew! That was a lot! But the database is completely set up now - the last thing we have to do is display it on the front end. Make these edits to home.ejs
<!DOCTYPE html>
<html>
<head>
<title>MEN Example</title>
</head>
<body>

<h1>My Example App</h1>

<form action='/add-entry' method='post'>
<input type='text' name='value'>
<input type='submit' value='Submit'>
</form>

<ul>
<li>I am an example element</li>
<% entries.forEach( function(entry) { %>
<li><%= entry.value %></li>
<% }) %>
</ul>

</body>
</html>
The code we added is what differentiates EJS from an HTML page - you can inject information sent to you from the server. Here, we iterate through every entry, and print out its value as a line in the unordered list.
Restart your app and refresh the browser page. Try submitting the form a few times, and watch as your list grows! You are successfully storing and retrieving data.
If there are any errors, check for typos first, and if you are sure that everything is entered correctly, go back to Module 01 for installing Mongo and make sure that Mongo is running - it may be that you aren't connecting to a local database.
And there you have it! You have a function web application running Express framework on a Node server, interacting with data stored in a Mongo database!
Now that you have a web stack configured, your machine is prepared to create and host a web application! We only walked through installation here, and a basic example, so visit a Project to learn how to use them to create something meaningful. The faster you get comfortable with these tools, the sooner you can expand into more tools and your own websites.